Knowledge Base
Frequently Asked Questions
Got a question? We've got answers. If you have some other questions, contact us.
For Professionals in Research and Clinical Diagnostics
Reagents
How can I assess the quality of my sample in MM MRD? What is the aim of analyzing mast cells?
Can I use stabilization solutions when processing low cellularity samples, e.g. CSF?
The Kappa and Lambda staining is not working well in plasma cells or B-cells, what can I do?
Should I titrate my antibodies before using them?
Licenses, requirements and compatibility
Which are the server requirements to use an Infinicyt™ network license?
How to get the best performance out of Infinicyt™ when working with a server or network drive?
How can I connect through remote server / desktop / control / access?
Can Infinicyt™ be installed on MAC machines?
How can I find the Serial Number (SN-XXX-XXX) of my Infinicyt™ license?
How to localize your current Infinicyt™ version?
What kind of files can Infinicyt™ open?
Which language packages are available with Infinicyt™?
How to obtain the .c2v file (from 1.8 versions and later versions) of a Infinicyt™ license?
How to obtain the .req file (Infinicyt™ 1.7 version (and previous versions)?
How to edit the file “Infinicyt.ini”?
What is the purpose of the Infinicyt™ Log File and how can I obtain it?
How can I update my Infinicyt™ license?
How can I update my Infinicyt™ license? - Admin Control Center method
How can I update my Infinicyt™ license? – RUS method
How can I transfer a software license to another computer?
How can I specify the license server on a network dongle environment?
Basic analysis and diagrams
Statistics
File Merge
Compass tool
Maturation tool
Compensation
Report
Reagents
How can I assess the quality of my sample in MM MRD? What is the aim of analyzing mast cells?
Mast cells have been identified as a relevant indicator of sample quality and hemodilution in some of the EuroFlow™ publications. In normal conditions mast cells are only present in bone marrow and not in peripheral blood, so a decrease of mast cells might indicate that peripheral blood has also been acquired in the sample.
The EuroFlow™ research has built normal databases using healthy donor bone marrow samples that allowed us to extract the normal reference ranges for each of the populations found in these samples. In Infinicyt™ each analyzed sample is compared these reference ranges and this allows us to detect possible hemodilution of the bone marrow sample.
The use of first-pull aspirates is highly recommended in order to decrease the chances of hemodilution when assessing MRD. Consecutive bone marrow aspirates may be hemodiluted.
Collection of 2 to 5 mL of sample is recommended to ensure that enough number of cells is processed and thus available for acquisition at the end of the processing and staining. Consider adjusting the volume used if other tests are required in addition to NGF-MRD.
Resources:
- EuroFlow™ guidelines for BM sample collection and transport for MM MRD measurements. Go to website.
- Flores-Montero J, et al. Next Generation Flow for highly sensitive and standardized detection of minimal residual disease in multiple myeloma. Leukemia. 2017;31(10):2094–103. Go to publication.
Are there specific requirements for anticoagulant used in MM MRD? Does anticoagulant used have an impact on the results?
It has been proven that EDTA is the most convenient anticoagulant to use when compared to others such as heparin. Specifically, heparin has been found to decrease the expression of certain markers on the cell surface, such as CD138 in plasma cells. Down-regulation of CD138 on the plasma cell surface has an obvious impact on the correct identification of these cells and the analysis of plasma cell dyscrasias.
Resources:
- Kárai B, et al. The impact of delayed sample handling and type of anticoagulant on the interpretation of dysplastic signs detected by flow cytometry. Biochem Med (Zagreb). 2018 Jun 15;28(2):020704. Go to publication.
- EuroFlow™ guidelines for BM sample collection and transport for MM MRD measurements. Go to website.
Is there any limitation regarding sample collection time? Does sample collection time have an impact on the quality of the sample and results of the analysis?
The more time that passes between extraction of the sample and processing and acquisition, the greater number of debris that will appear in the sample. This is due to the fact that cells will dye and modify their aspect due to damages in their structure.
In the images below we display a comparison between two samples acquired immediately after extraction (left) and 48 hours after extraction (right).
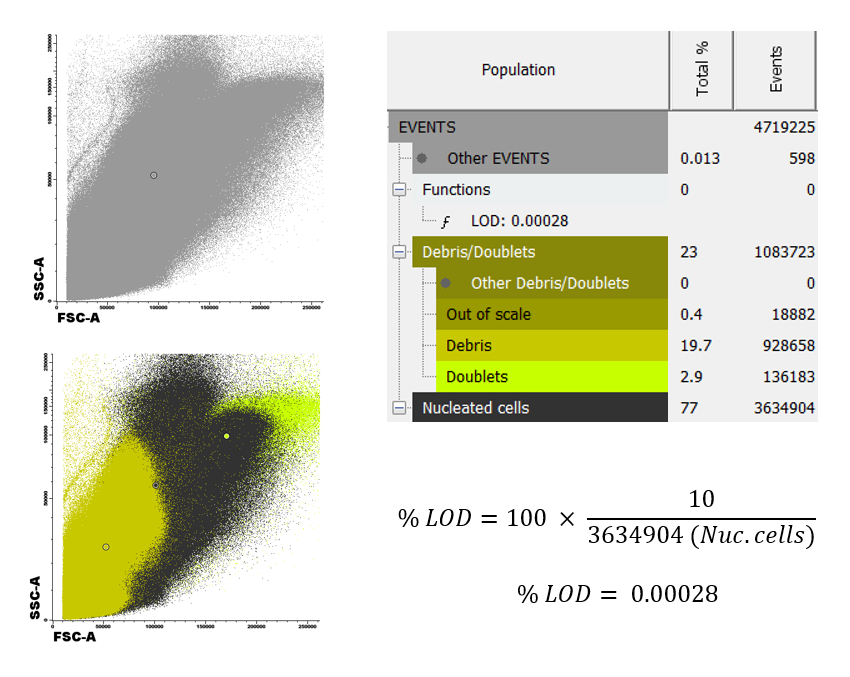
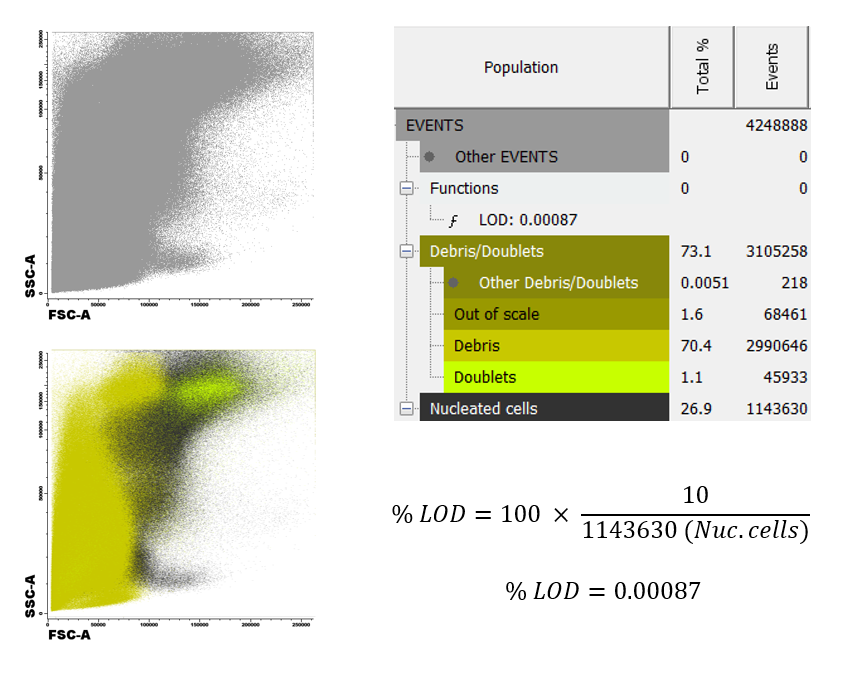
The percentage of debris found in the second case is above 70% of the total sample, compared to 20% if the first case. This will lead to a very significant change in the number of nucleated cells measured, which will in turn modify our Limit of Detection (LOD) and sensitivity of the analysis.
It is very important to process the sample within the first 36 hours after its extraction.
Resources:
- EuroFlow™ guidelines for BM sample collection and transport for MM MRD measurements. Go to website.
- Diks AM, et al. Impact of blood storage and sample handling on quality of high dimensional flow cytometric data in multicenter clinical research. J Immunol Methods. 2019 Dec;475:112616. Go to publication.
Can I use stabilization solutions when processing low cellularity samples, e.g. CSF?
The use of stabilization solutions prevents cellular loss, and it is very important in some types of samples such as cerebrospinal fluid (CSF) or others with low cellularity.
A proper diagnostic procedure requires standardization in achieving the optimal and minimum timeframe between sample extraction and analysis. Unfortunately, this might be difficult to be put into practice in the daily routine, specially under specific settings such as when samples are collected out of office hours or they require a long shipment to the laboratory.
The use of a fixative agent in a CSF sample can prevent cellular loss and therefore avoid false negative results, when compared with an unfixed sample.
Using transfix or other stabilization reagents is not necessary when performing NGF-MRD analysis of multiple myeloma. Optimal results in MM MRD analyses should be achieved by strictly adhering to the guidelines and recommendations by EuroFlow™ and using standardized solutions such as the Next Generation Flow™ Cytognos solution. The use of other stabilization reagents should be validated prior to adoption in routine in order to assess potential changes in the results or alterations in the immunophenotype of cells (especially plasma cells).
Resources:
- Sedek L, et al. The influence of fixation of biological samples on cell count and marker expression stability in flow cytometric analyses. Cent Eur J Immunol. 2020 Jun;45(2):206-213. Go to publication.
- de Jongste AH, et al. Use of TransFix™ cerebrospinal fluid storage tubes prevents cellular loss and enhances flow cytometric detection of malignant hematological cells after 18 hours of storage. Cytometry B Clin Cytom. 2014 Jul;86(4):272-9. Go to publication.
- TransFix® A Cellular Antigen Stabilisation Reagent – Cytomark UK. Go to website.
Can I use my own lysis solution when following the EuroFlow™ protocols? Are there differences between the different lysis solutions available?
The lysis solution and protocol used have a huge impact on the outcome of our flow cytometry analysis. Depending on the application and the studies to be performed, the selection of the lysis solution may vary in order to obtain good quality results.
The EuroFlow™ research shows that depending on the used lysis solution and the washing protocols, the distribution of the populations is affected, and we can observe overlapping or non-separated populations (Ammonium Chloride) or duplicated populations (SLNW with VersaLyse), instead of the classical distribution where the main leucocyte populations (lymphocytes, monocytes and neutrophils) are clearly differentiated.
- SLNW: Stain Lyse No-Wash
- SLW: Stain Lyse Wash
- SLWF: Stain Lyse Wash Fix
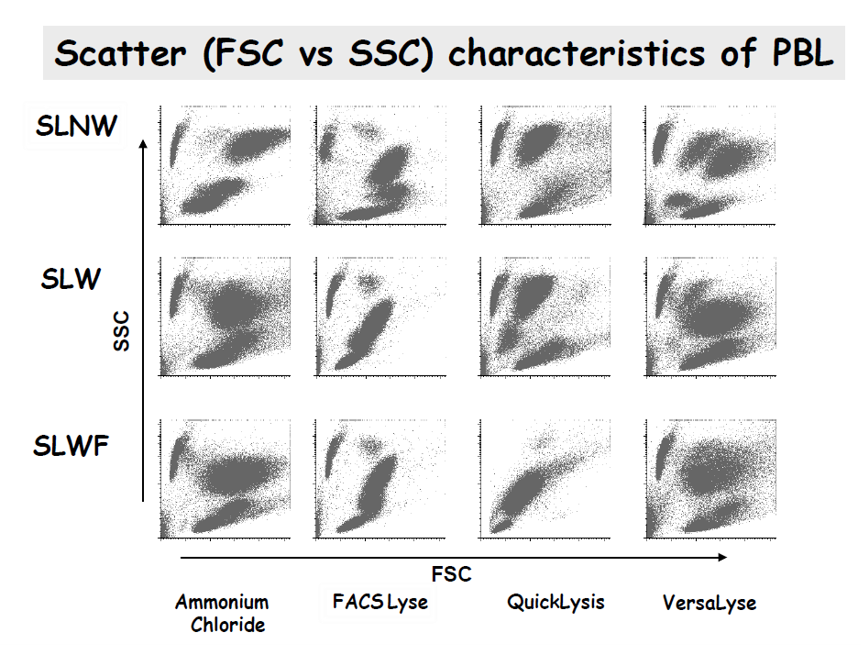
Stain Lyse Wash (SLW) with FACSLysis was the method selected by EuroFlow™ for the generic EuroFlow™ SOP for flow cytometry analysis. On the other hand, for high sensitivity studies where a large number of cells must be processed, the Stain Lyse Wash Fix (SLWF) with Ammonium Chloride is recommended. That is the BulkLysis protocol used in the Multiple Myeloma MRD Panel or the Primary Immunodeficiency Orientation Tube, among others.
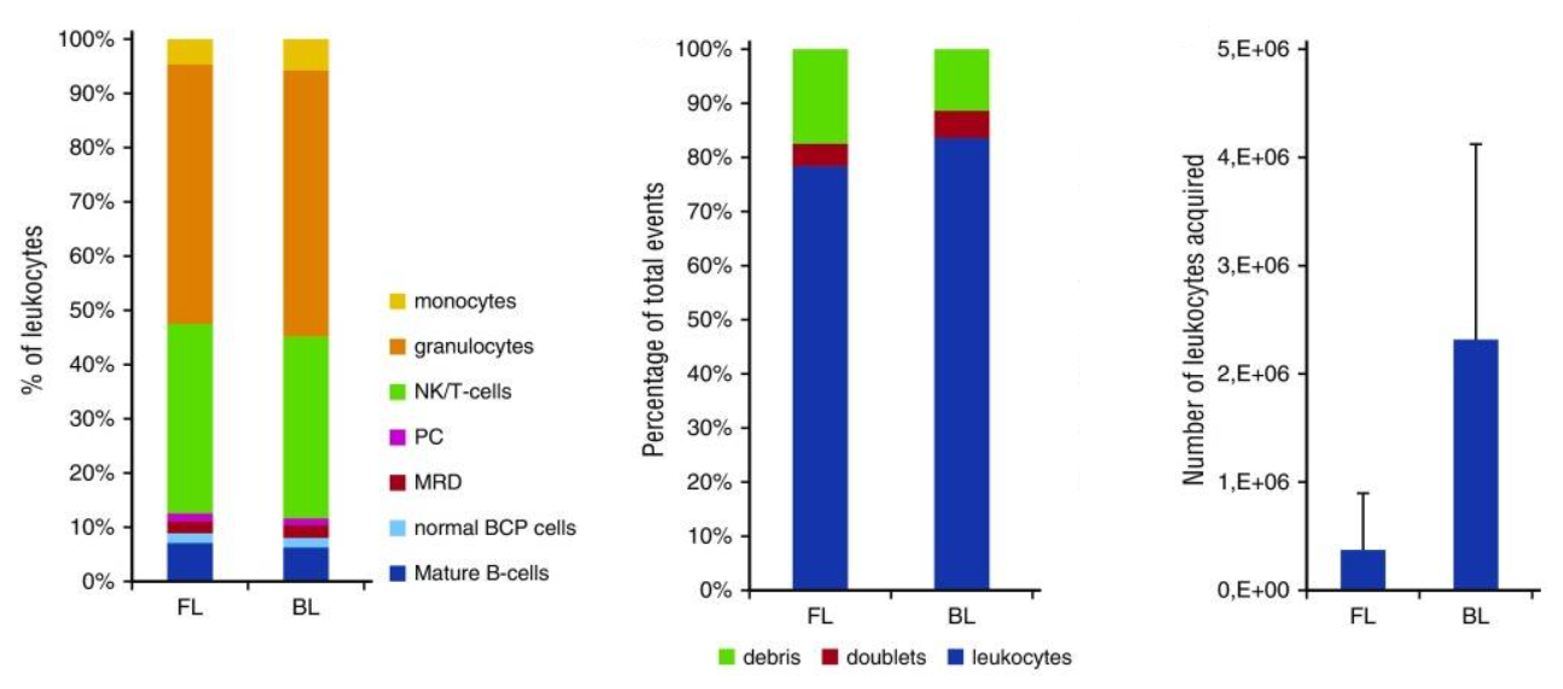
The BulkLysis allows to obtain the same percentage of leucocytes and each subpopulation, while keeping debris low (even decreased when compared with the FACSLysis) and acquiring much bigger number of leukocytes. At the end, it allows us to enhance the sensitivity of the protocol if needed and also save time and money through the concentration of the sample.
Resources:
- Kalina T, et al. EuroFlow standardization of flow cytometer instrument settings and immunophenotyping protocols. Leukemia. 2012 Sep;26(9):1986-2010. Go to publication.
- Theunissen P, et al. Standardized flow cytometry for highly sensitive MRD measurements in B-cell acute lymphoblastic leukemia. Blood. 2016 Jun; 129(3): 347-57. Go to publication.
The Kappa and Lambda staining is not working well in plasma cells or B-cells, what can I do?
Kappa and Lambda staining must be correctly performed in order to ensure adequate separation of Kappa and Lambda populations and correct identification of normal and abnormal cells.
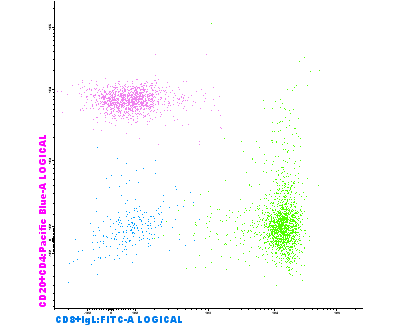
In a case where there is not a correct separation between the Kappa and Lambda populations (diagram on the right), we could not easily conclude that there is a immunoglobulin restriction and presence of an abnormal population.

There are various methods that can be used when this staining does not work well:
- Wash light chains in the plasma. Before staining with anti-Kappa and anti-Lambda antibodies it is strictly necessary to wash the sample in order to remove the free light chains present in the plasma. Three washing steps are recommended before staining and they should be carefully performed by using the recommended reagents, reagent volumes and centrifuge steps (neither more speed, nor less time); every change in the protocol might have an impact on the final result.
- Use an intracellular staining method, such as Fix & Perm. The Fix & Perm protocol allows permeabilization of the cell surface so that antibodies can enter the cell and bind to the relevant markers. Intracellular Kappa and Lambda staining can provide more consistent and higher signals and thus it is recommended for specific protocols such as the Multiple Myeloma MRD Panel by EuroFlow™.
Use other cells as internal control. Like in other flow cytometry analyses, other cells which are positive or negative for a given marker should be used as internal control for comparison of our cells of study. For example, we can assess the presence of differentiated Kappa and Lambda B-cells, and use those to analyze whether the plasma cells have been correctly stained or not (plasma cells usually display much higher immunoglobulin staining than B-cells).
Should I titrate my antibodies before using them?
Antibody titration is recommended when a new antibody lot arrives to the laboratory, in order to test it and quantify the amount of antibody required to achieve a good staining pattern of our cells. Usually, the objective is to obtain the best separation between positive and negative populations with the lowest volume of antibodies, thus saving money and reducing unspecific staining or background noise.
On the other hand, antibody titration can take a huge number of resources in the laboratory routine, due to the various reagents used, and the long time the process can take.
At Cytognos we perform thorough and detailed quality control processes that ensure reproducibility and comparability between the different lots of each of our antibodies. We make sure that each of our antibodies provide convenient results and an adequate staining pattern under the tested conditions so that you can later use them directly at your laboratory by following our recommended protocols, without the need for additional titration.
The lyophilization procedure in some of our EuroFlow™ kits is another feature that provides enhanced stability and reproducibility, ensuring standardization between various samples and lots along time.
How often do I need to check the FSC and SSC?
Our instruments must be correctly set up and we need to track the day-to-day performance to ensure consistent data over the time. The EuroFlow™ consortium performed several tests regarding the configuration of the forward and side scatters in order to find a configuration that enabled the most appropriate positioning of lymphocytes and myeloid populations.
If FSC or SSC are too high, gating on single cells can be difficult or we can lose some populations. If they are set too low, we might lose the separation between debris and cell populations and thus the sensitivity will decrease.
Daily check of the FSC and SSC is recommended to monitor the stability of our instrument prior to acquisition of clinical samples. This should be performed using an unstained normal peripheral blood sample so as to avoid misinterpretation due to the presence of cells with an abnormal size.
Resources:
- Kalina T, et al. EuroFlow standardization of flow cytometer instrument settings and immunophenotyping protocols. Leukemia. 2012 Sep;26(9):1986-2010. Go to publication.
- EuroFlow™ Standard Operating Procedure (SOP) for Instrument Setup and Compensation. Go to website.
What voltages should I use to configure my instrument? How can I track the stability of my instrument?
To ensure reproducible measurement of cells in a multicenter setting and along time, EuroFlow™ proposed the standardization of the instrument settings using the EuroFlow™ Rainbow beads.
First, using the EuroFlow™ Rainbow beads, we can ensure that several instruments with the same or different configuration provide a homogeneous and comparable result when acquiring the same sample. The EuroFlow™ Rainbow beads allow us to modify the voltages of our instrument until we reach a given MFI target. Later, if we acquired the same sample in two instruments such as Omnicyt™ and the BD FACS Canto II, we would obtain a similar result, with lymphocytes and other populations placed more or less in the same position, so that we can eventually compare files from different centers.
On the other hand, this methodology also enables us to track the stability of our single instrument along time. By measuring the EuroFlow™ Rainbow beads every day we can monitor the performance and alignment of our lasers or PMTs and thus make sure that our populations will be kept on the same position.
Resources:
- Kalina T, et al. EuroFlow standardization of flow cytometer instrument settings and immunophenotyping protocols. Leukemia. 2012 Sep;26(9):1986-2010. Go to publication.
- EuroFlow™ Standard Operating Procedure (SOP) for Instrument Setup and Compensation. Go to website.
How should I perform compensation? What is the difference between “generic” and “specific” compensation?
Compensation allows us to correct the spill-over that other antibodies and their fluorochromes introduce in each specific fluorochrome measurement (coming from a single PMT). In order to perform compensation, we acquire each fluorochrome in a single stained sample in order to obtain a pattern of its spill-over into the other fluorochromes and then we use this pattern as the correction factor in our samples.
Traditionally, each fluorochrome had a stable spill-over pattern that applied to every reagent independently of the marker used (CD45, CD8, CD19…) and its manufacturer. Thus, we only needed one compensation tube for each of the single fluorochromes we used.
The introduction of tandem dyes such as phycobiliprotein tandems (with cyanine) and polymers (Brilliant Violet™) gave us the possibility to increase the number of fluorochromes we had, due to the flexibility of these molecules. On the other hand, regarding compensation, it is known that the spill-over pattern of these tandem dyes is not the same for each of them. In general, the spill-over pattern of tandem dyes differs depending on the marker conjugated to the fluorochrome (CD45, CD8, CD19…), the manufacturer of the dye and even within different lots of the same manufacturer. This is what EuroFlow™ defined as “specific” compensation, that forces us to introduce new compensation tubes, not only one for each fluorochrome, but also for each marker-fluorochrome combination and their new lots.
Generic compensation fluorochromes:
- FITC, PE, PerCP-Cyanine 5.5, APC, OC515™, Pacific Blue™, Pacific Orange™…
- PerCP-Cyanine5.5 is a highly stable tandem dye that does not require specific compensation for different markers. Specific compensation might be required when using reagents from different manufacturers.
- OC515™ and Pacific Orange™ are different dyes with similar spectral properties (emission around 515 nm) and they require separate generic compensation because they are two different fluorochromes.
Specific compensation fluorochromes:
- APC-C750
- PE-Cyanine7
- Brilliant Violet™
The bright side of this story is that at the moment all manufacturers take extra care in developing high quality tandem fluorochromes that provide homogeneous and reproducible signals between different lots and along time, so the requirement of “specific” compensation decreases.
Resources:
- EuroFlow™ Standard Operating Procedure (SOP) for Instrument Setup and Compensation. Go to website.
Licenses, requirements and compatibility
Which are the server requirements to use an Infinicyt™ network license?
There are no differences regarding requirements for standalone and network licenses. Server requirements are the same of the user computer.
How to get the best performance out of Infinicyt™ when working with a server or network drive?
In order to improve Infinicyt™ performance, it is strongly recommended to download any FCS files or INP profiles from the server to your computer and work with them locally. This will prevent Infinicyt™ from slowing down, particularly important when working with files with a large number of events.
Does a network license always have to be used on a local area network or is it also possible to use it on an external area network (e.g. VPN)?
Infinicyt™ network licenses can be used both in local and external area networks. We recommend the use of local area networks because external area networks may suffer connection cut-offs and provoke the loss of the link to the key, but this actually depends on the network characteristics and stability. Infinicyt™ functionality is only guaranteed with local network use.
How can I connect through remote server / desktop / control / access?
There are 2 potential solutions:
- Connecting through TeamViewer or AnyDesk. Please review the security policies of your hospital or institution before choosing this option. These software are especially useful if your institution has access to the enterprise/premium versions, with better features than free versions.
- Connecting through VNC (Virtual Network Computing, a system to remotely control another computer, allowing to use a computer (server) and its programmes through another computer (viewer)). This option only works if a VPN (Virtual Private Connection) is available. The VPN extends the private network across a public network and allows users to send and receive data through it as if their computers were directly connected to the private network.
Can Infinicyt™ be installed on MAC machines?
Infinicyt™ can be used on a Mac computer as long as a Windows Operating System is installed on the same device.
Intel processors
There are several ways to install Windows on a Mac.
- Creating a hard‑disk partition using Boot Camp, a tool included in macOS versions that support Intel processors. This method allows you to choose the operating system each time the computer starts. For more information, please visit Apple’s website.
- Creating a virtual machine using dedicated software, such as Parallels Desktop or VirtualBox. These solutions allow you to install Windows within macOS and run it as an independent application.
Infinicyt™ will work using any of these options, although Boot Camp is recommended on Intel‑based Macs because it generally provides better performance compared to virtual machines.
ARM processors
- Infinicyt™ is not compatible with ARM processors.
- Therefore, it cannot run on Mac computers equipped with Apple Silicon chips (M1, M2, M3, M4, M5), even when using Parallels or other virtualization tools, since Windows ARM is not supported by Infinicyt™.
How can I find the Serial Number (SN-XXX-XXX) of my Infinicyt™ license?
You have the next options to localize the Serial Number:
On the package box
You can find the Serial Number on the package box received with your license.
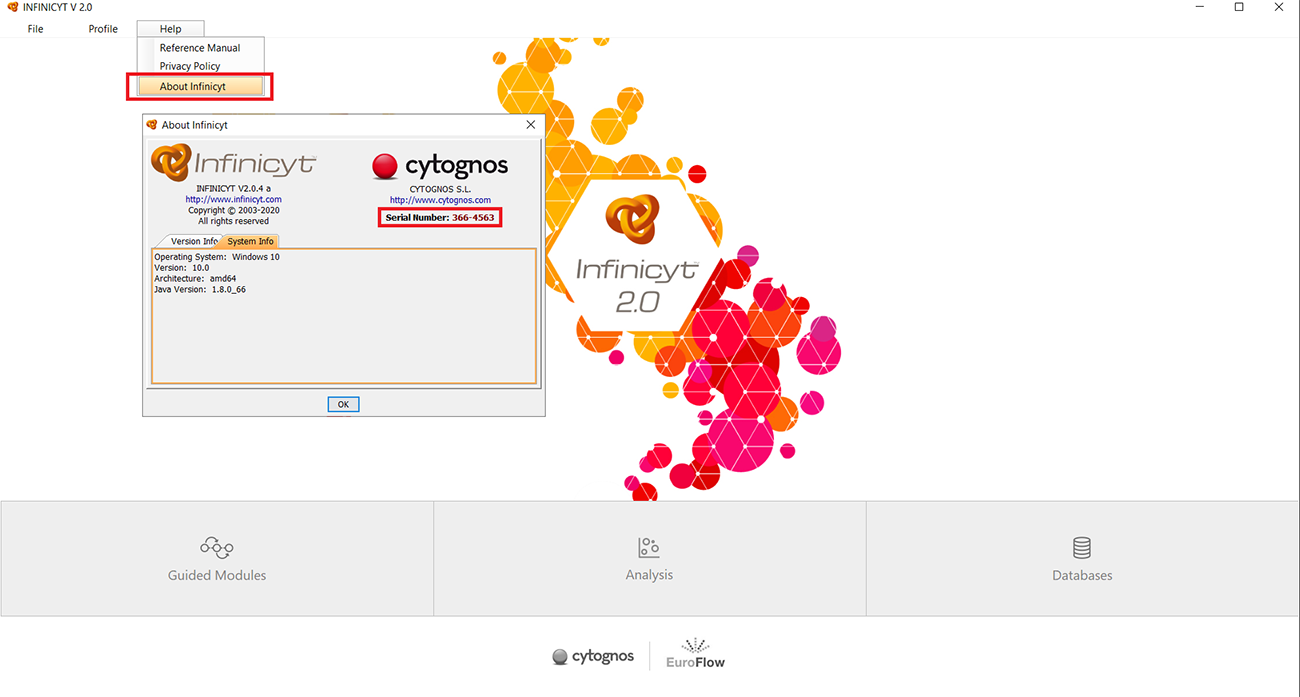
Opening Infinicyt™
You can find the Serial Number by opening Infinicyt™, in the main page of the program: label “Help” > “About Infinicyt” as indicated in the figure below:
If you do not have the package box and you cannot open Infinicyt™
If you cannot localize your Serial Number with the previous instructions, please send us the .c2v/.req file as indicated below:
- If Infinicyt™ has NOT been already installed in your computer, you can obtain your .c2v file following the instructions in How to obtain the .c2v file of a hardware license when Infinicyt™ has NOT been previously installed in the computer?.
- If Infinicyt™ has been previously installed in your computer, for Infinicyt™ 1.8 and 2.0 versions, you can obtain your .c2v file following the instructions in How to obtain the .c2v file (from 1.8 versions and later versions) of a Infinicyt™ license?.
- If Infinicyt™ has been previously installed in your computer, for Infinicyt™ 1.7 and below versions, you can obtain your .req file following the instructions in How to obtain the .req file (Infinicyt™ 1.7 version (and previous versions)?.
How to localize your current Infinicyt™ version?
There are two options to localize the Infinicyt™ Version:
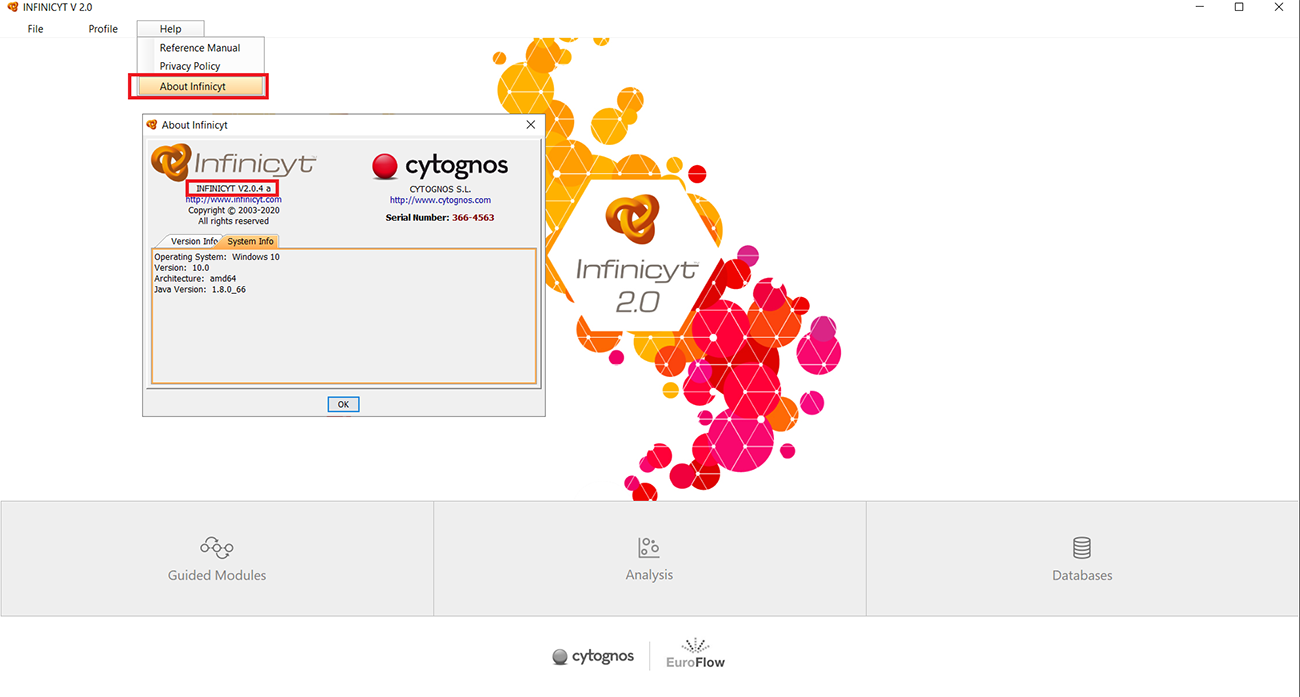
Opening Infinicyt
You can find the Infinicyt™ version by opening Infinicyt™, in the main page of the program: label “Help” > ”About Infinicyt” as indicated in the figure below:
Without opening Infinicyt™
To localize your Infinicyt™ version, access the following route: C:/Program Files/Cytognos/Infinicyt
Where you will find the file "version".
Use the program Notepad to open this file, and check the complete version number.
What kind of files can Infinicyt™ open?
Infinicyt™ supports all FCS files that follow the Flow Cytometry Standard format for data files. All cytometers that generate files using FCS standards (2.0, 3.0 and 3.1) will be compatible with Infinicyt™.
Infinicyt™ can also read 18-, 20- and 22-bit FCS files.
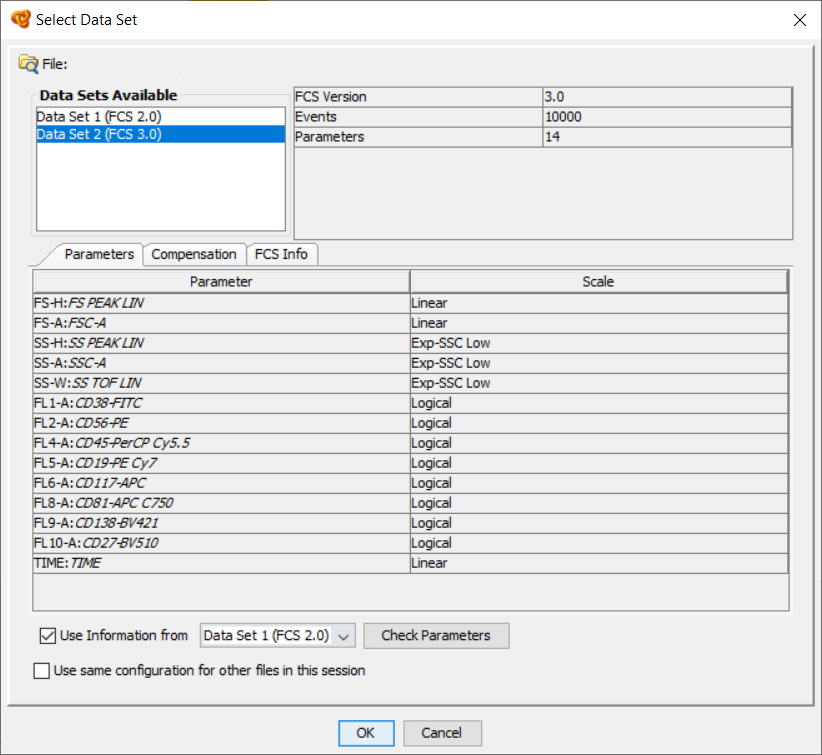
Some cytometers generate files with two different data sets: Dataset 1 (FCS 2.0) and Dataset 2 (FCS 3.0). For example Beckman Coulter® LMD files in Navios. Infinicyt™ can open files with these characteristics. Once the file is selected, Infinicyt™ notifies the user about this situation and asks which Datasets to open. By default, we advise to use Data set 2 and complete it using information from Data set 1.
Which language packages are available with Infinicyt™?
Infinicyt™ is available in English and Spanish. This applies to the software interface and the Reference Manual.
Furthermore, the Automatic Report used in the EuroFlow™ Databases is available in the following languages: Czech, German, French, Italian, Japanese, Korean, Dutch, Polish, Portuguese, Romanian and Chinese.
How to obtain the .c2v file of a hardware license when Infinicyt™ has NOT been previously installed in the computer?
If Infinicyt™ has not been previously installed, you must follow these steps to obtain the .c2v file of a hardware license:
- Connect the dongle to the USB port.
- Download the RUS tool from the following link: RUS tool.
- Open the RUS tool and click on the tab "Collect Status Information".
- Select "Update of existing protection key".
- Click on "Collect Information".
- Save the file with the extension .c2v.
- Send the file generated to us via Contact Us.
How to obtain the .c2v file (from 1.8 versions and later versions) of a Infinicyt™ license?
C2V files contain information about the license and protection of the software. They do not contain private customer information. These steps can be performed when the Infinicyt™ software is installed on the computer, and you have access to the Admin Control Center (localhost:1947). Otherwise please Contact us.
You must follow these steps to obtain the .c2v file of a hardware license:
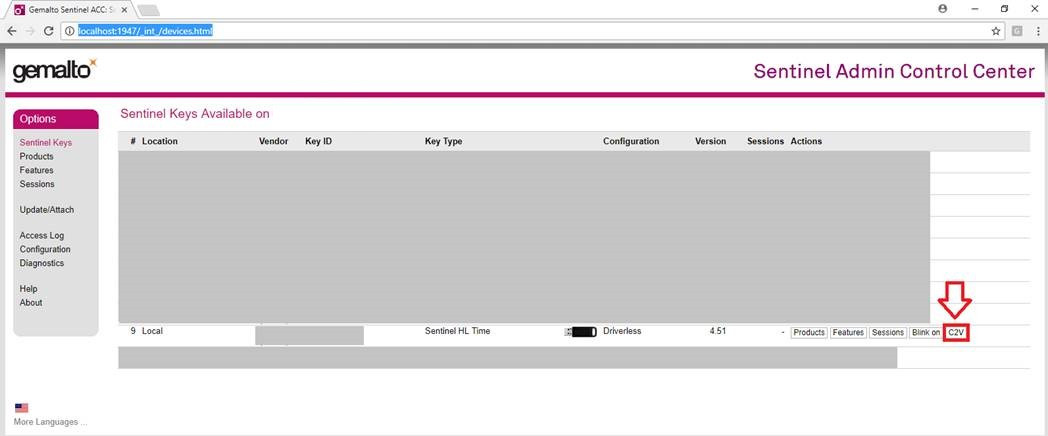
- Connect the USB dongle to a serial port on the computer.
- Open the Sentinel Admin Control Center from the link: Sentinel Admin Control Center.
- Locate the dongle and click on C2V icon:
- Download the file (extension .c2v).
How to obtain the .req file (Infinicyt™ 1.7 version (and previous versions)?
REQ files contain information about the license and protection of the software. They do not contain private customer information. To obtain the .req file in Infinicyt™ 1.7 version and previous versions, you must:
- Download the Secure Update Utility from the link: Secure Update Utility.
- Extract the program from the .zip file you have just downloaded to any folder on your computer.
- Launch it by double clicking on .exe file.
- Ensure that you have plugged in your computer the right USB dongle to be updated.
- Click on the “Generate Request Code” button.
- A "Save as..." window will appear. Write your serial number as file name and then click on the Save button.
- Send the .req file that has been generated to us via Contact Us.
How to edit the file “Infinicyt.ini”?
Inside the Infinicyt™ installation folder (usually C:/Program Files/Cytognos/Infinicyt), you’ll find a file named “Infinicyt.ini”. In order to edit it, simply open it with notepad, after that add the lines that you may need and save it (“File” > “Save”).
Some examples of typical lines to add are:
Note: Some operating systems, may not allow you to edit and save “Infinicyt.ini” from the Infinicyt™ installation folder. In that case, copy “Infinicyt.ini” to any other folder with write permissions (e.g.: The Desktop), edit and save it, and then copy it again to the Infinicyt™ installation folder, overwriting the old file.
- Select in the Hard disk (C:) the following folders:
C:/Program Files/Cytognos/Infinicyt - Localize the file “Infinicyt.ini” in Infinicyt™ folder. Copy this file on your desktop, open it and edit it as required.
- Save the new “Infinicyt.ini” file. Replace with this new file the previous “Infinicyt.ini” file that you had in
c:/Program Files/Cytognos/Infinicyt. - Open Infinicyt™ and all changes that you have introduced in the "Infinicyt.ini" wil take place.
What is the purpose of the Infinicyt™ Log File and how can I obtain it?
Log is the file extension for an automatically produced file that contains a record of events from certain software and operating systems. The point of a log file is to keep track of what’s happening behind the scenes and if something should happen within a complex system, you have access to a detailed list of events that took place before the malfunction.
The Infinicyt™ Log File is a text file containing a registry of most of the activities performed by the software during its functioning. It gives us information about how the program starts (which is the library loaded, the memory used…).
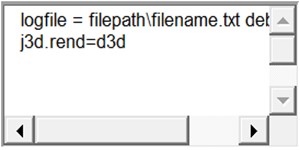
In order to force Infinicyt™ to create a Log File you should edit the file “Infinicyt.ini” (consult the FAQ How to edit the file “Infinicyt.ini”?). Inside the “Infinicyt.ini” you will add some lines of text to enable the process, as indicated below:
- Go to
C:/Program Files/Cytognos/Infinicyt - Localize the file “Infinicyt.ini” in the Infinicyt™ folder. Copy this file on your desktop, open it and edit it by adding the following line:
logfile=c:\myfolder\errorfile.txt
In the previous path in “myfolder” you should type the name of a folder that exists in your computer, such as Users\USERNAME\Desktop. The process will not work if the pathway or folder do not exist.
A more detailed version can also be created if the following line is added:
logfile=c:\myfolder\errorfile.txt
debugjvm=1
- Save the new “Infinicyt.ini” file. Replace with this new file the previous “Infinicyt.ini” file that you had in
c:/Program Files/Cytognos/Infinicyt. - Open Infinicyt™ and proceed to reproduce the issue.
- The log file document will be generated in “myfolder”.
How can I update my Infinicyt™ license?
Our automatic update system will carry out the process in a simple way.
- You must perform these actions on a computer where you have installed Infinicyt™ software or Infinicyt™ driver and you have internet connection.
- Ensure that you have plugged in your computer the Infinicyt™ USB dongle that you want to update. If possible, please take out any other USB dongle connected.
- Go to https://go.cytognos.com/licenseupdate.
- Click on “License Update” tab.
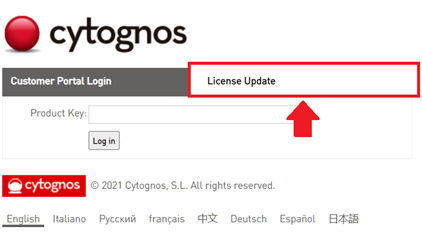
- Click on the “Update Licenses” button.
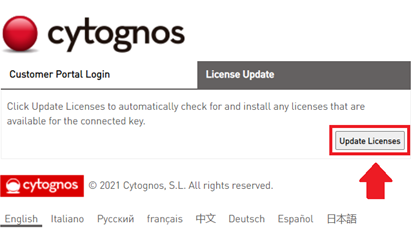
- The Infinicyt™ license will be updated and the web will display a success message “Licenses updated successfully”.
Error messages and troubleshooting – EMS
Message: “To check for updates, the latest Sentinel LDK Runtime Environment must be installed. For assistance, contact Customer Support.”
Please follow the instructions below:
- Go to Admin Control Center > Configuration > Network (http://localhost:1947/_int_/config_network.html).
- At the bottom of the page, in the “EMS URL” section, add the following entries:
http://www.infinicyt.com:9080
https://ems.cytognos.com:8443
https://ems.cytognos.com:443
https://ems.cytognos.com
Do not edit or delete any of the existing information.
Then click on the “Submit” button.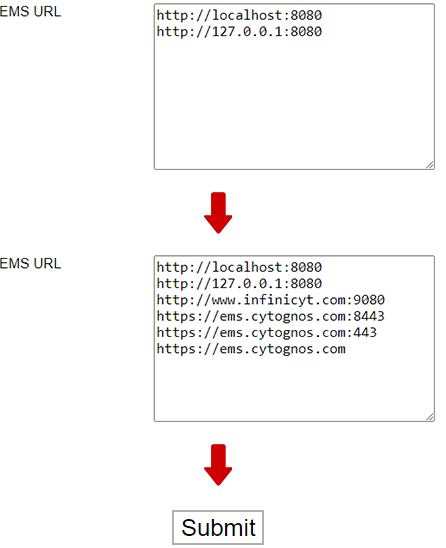
- Now you should be able to perform the update process successfully.
Additionally, this error will be fixed automatically when you install the latest version of Infinicyt™ 2.0 available at your Infinicyt™ Users Area.
If due to security restrictions, you cannot access the local tool Admin Control Center > Configuration > Network (http://localhost:1947/_int_/config_network.html).
Please follow these steps to perform the configuration using the configuration file.
- Locate and open the configuration file hasplm.ini, located in the following paths according to your system
- For Windows x64: %CommonProgramFiles(x86)%Aladdin SharedHASPhasplm.ini
- For Windows x86: %CommonProgramFiles%Aladdin SharedHASPhasplm.ini
- Locate the [EMS] section or create it at the end of the file if it does not exist
- Make a backup copy of the file, for example, by copying it to another location or by duplicating the file and renaming it.
- Add the following entries inside the [EMS] section:
http://www.infinicyt.com:9080
https://ems.cytognos.com:8443
https://ems.cytognos.com:443
https://ems.cytognos.com
Do not edit or delete any of the existing information in thehasplm.iniconfiguration file - Finally, save the file with the same name and in the same location, replace the file if necessary and restart the "Sentinel LDK License Manager" service to get the configuration working.
Additionally, this error will be fixed automatically when you install the latest version of Infinicyt™ 2.0 available at your Infinicyt™ Users Area.
Message: “The most up-to-date licenses are already installed.”
The Infinicyt™ license has already installed the latest update available. The Database Accesses have been already stored within your Infinicyt™ license, so there is nothing more that you must do. You can review the number of Database Accesses available in your Infinicyt™ license by opening Infinicyt™ > Databases.
If you have several Infinicyt™ licenses, please confirm that you are updating the correct one by checking the Infinicyt™ Serial Number (How can I find the Serial Number of my Infinicyt™ license?).
Please contact us if you think there is a problem related to your license or update.
Message: “Connect at least one key.”
An Infinicyt™ license is not connected to this computer or it cannot be detected.
I cannot update my Infinicyt™ License in a computer where Infinicyt™ is installed and there is internet connection.
If you do not have access to a computer where Infinicyt™ is installed and you have internet connection, we recommend you install Infinicyt™ in any other computer. You do not need to install the Database Connector there and you will not need to open Infinicyt™ there. If this is not possible either, please contact us and we will provide another installation protocol.
How can I update my Infinicyt™ license? - Admin Control Center method
When the automatic license update could not be used, alternative methods are available. You must perform these actions on a computer where you have installed Infinicyt™ software or Infinicyt™ driver and the support team should have sent you one or more manual update files (.V2C).
- Ensure that you have plugged in your computer the Infinicyt™ USB dongle that you want to update. If possible, please remove any other USB dongle connected.
- Open an Internet window and go to Admin Control Center http://localhost:1947.
- In the menu, select Update/Attach.
- In the Apply File section you have a box to select a file.
- Here you have to select the .V2C file.
- Once selected, click on the Apply File button.
- Your dongle will be updated.
How to obtain the .c2v files of an Infinicyt™ license when Infinicyt™ has NOT been previously installed on the computer or you do not have access to Admin Control Center?
C2V files contain information about the license and protection of the software. They do not contain private customer information. If Infinicyt™ has not been previously installed or you do not have access to Admin Control Center (localhost:1947), you must follow these steps to obtain the .c2v file of a hardware license:
- Connect the dongle to the USB port.
- Download the RUS tool from the following link: RUS tool.
- Open the RUS tool and click on the "Collect Status Information" tab.
- Select "Update of existing protection key".
- Click on "Collect Information option".
- Save the file with the .c2v extenison.
- Send the file generated to us via Contact Us.
How can I update my Infinicyt™ license? – RUS method
When the automatic license update could not be used and due to security limitations it is not possible to access the Admin Control Center, alternative methods are available. You must perform these actions in a computer where you have installed Infinicyt™ software or Infinicyt™ driver and the support team should have sent you one or more manual update files (.V2C).
- Connect the dongle license to the USB port.
- Download the RUS tool from the following link: RUS tool.
- Select the manual update file sent to you by the support team (.V2C file)
- Click "Apply update".
- Your dongle will be updated.
How can I transfer a software license to another computer?
The software key is sensitive to computer hardware changes and a reinstallation of the operating system may cause it to be lost. When you want to transfer a software key to another computer, you must follow these steps.
Rehosting an SL key
Use the RUS Utility to transfer an SL key from one computer (the source computer) to another (the recipient computer). This is a three-step procedure that uses the RUS utility on both computers.
NOTE: The following requirements apply:
- The RUS utility must be present on both computers.
- Infinicyt™ software or Infinicyt™ driver must be installed on both computers.
- If the recipient computer is a virtual machine, the license must allow the protected application to operate on virtual machines.
Step 1: Collect Information About the Recipient Computer
- On the recipient computer, launch the RUS utility (rus.exe).
- Click the Transfer License tab.
- Follow the instructions labeled “Step 1” to collect the information about the computer and save it to a file. Make sure that the file (or a copy of the file) is accessible on the source computer.
Step 2: Generate the License Transfer File
- On the source computer, launch the RUS utility (rus.exe).
- Click the Transfer License tab.
- Follow the instructions labeled ""Step 2"" to select the SL key to transfer, read the recipient information file, and generate a license transfer (h2h) file. Make sure that the license transfer file (or a copy of the file) is accessible on the recipient computer.
NOTE: After performing this step, the SL key is no longer available on the source computer. Be sure to keep a copy of the transfer file until you have completed the transfer procedure.
Step 3: Apply the License Tranfer File
- On the recipient computer, in the RUS utility, click the Apply License File tab.
- In the Update File field, click the browse button and locate the license transfer (h2h) file.
- Click Apply Update. The SL key is installed on the recipient computer.
NOTE: To ensure the success of the transfer procedure, all the steps in the procedure should be completed within no more than a few days of the time you first start the process.
How can I specify the license server on a network dongle environment?
In a network environment, where there is a computer that acts as a server (and where the license is connected or installed), and one or more clients that connect to that server, it is sometimes necessary to specify in the clients where to find that server.
To do this, follow the steps below:
- Go to Sentinel Administration Control Center Settings: http://localhost:1947/_int_/config_to.html
- Check that the "ALLOW REMOTE LICENSE ACCESS" option is checked. When selected, it allows the client to connect to remote license servers on the network.
- Verify that "AGGRESSIVE SEARCH FOR REMOTE LICENSES" is checked. Aggressive search can allow firewalls to be passed and remote license servers that are located on enterprise networks to be accessed.
- In the "SPECIFY SEARCH PARAMETERS" section you must define the specific server where the remote license is located. You must enter information in this field, as shown below:
Specify data such as IP addresses (e.g., 10.161.25.21), broadcast addresses (e.g., 10.161.25.255) or computer names (e.g., licensemanager01.test.local). - To apply the changes on this page, click Submit.
Standalone installation of Infinicyt™ driver
In certain situations you may need to install only the driver that Infinicyt™ uses to manage licenses, rather than the entire software.
This is common, for example, on servers that act solely as a network license server.
To do this, follow the steps below and make sure you have administrator rights on your computer. If you do not, contact your IT department.
- Download the latest driver for infinicyt™ software from our server: haspdinst.zip.
- Extract the .exe file (contained in the zipped folder you just downloaded) to a base location on your system, such as C:
- Click on the Windows Start menu. In the search field type cmd and press Enter. The Command Prompt window will be displayed.
- Navigate via Command Prompt to the location where you dropped the haspdinst.exe file.
- Type
haspdinst -iin the command line. The installation or upgrade process is performed automatically. A message is displayed to inform you that the Sentinel LDK Run-time Environment was successfully installed.
To perform the opposite process, uninstall it, the command haspdinst -r will perform the uninstallation of the Infinicyt™ driver.
Basic analysis and diagrams
How do Infinicyt™ gates work?
With Infinicyt™, gates are free-handed. Just click, drag to select the desired events and drop. These gates can be drawn on density plots, histogram plots or dot plots.
You can draw all the consecutive gates necessary to define a population on several diagrams (including different types of diagrams, for example dot plots and APS diagrams).
You can also modify or eliminate a gate once a selection has been assigned to a population. In order to do this, the Review column should be visible in the Manual Analysis window. Click on the magnifying glass corresponding to that population to see where the gates have been drawn, from here you can readjust and move the gates or even delete them by pressing the delete button.
Can overlays be done with Infinicyt™?
Overlays can be done with Infinicyt™ in multiple manners. The software allows to display on the same diagram at the same time as many populations or files as desired (coming from the same sample or not).
In order to display several populations, you need first to identify the events corresponding to each population by gating on these events. Then you can use the Visibility column to display or hide each population on all diagrams (what we call Global Visibility).
You can also modify the visibility options of a single diagram (Local Visibility), right click on the diagram > “Local Visibility” > “Population”, and select the populations of interest. The easiest manner to do this configuration is to select the populations of interest in the Manual Analysis window before opening the Local Visibility, so that these are automatically selected then.
In order to overlay the same or different populations from different files/samples you need to open these files at the same time. Then analyze the populations of interest and assign the events to different populations. You might want to assign the events of each file to different populations (instead of assigning them to the same) in order to be able to give them a different color.
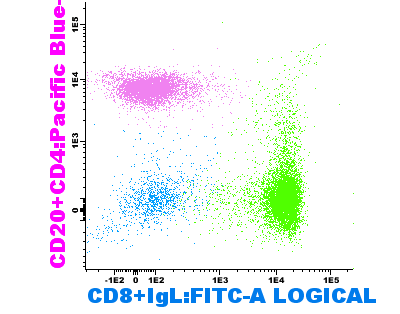
Below you can find some examples of overlays created with Infinicyt™:
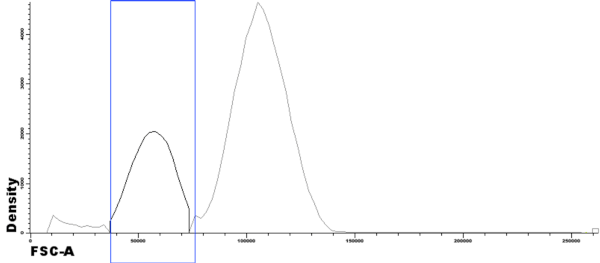
- Basic Histogram showing a single population in a single file. A gate has been drawn in the histogram by clicking and dragging on it, thus selecting the events highlighted in black (and squared in blue). These events can be assigned to a population by clicking on the label of population on the Population Tree.
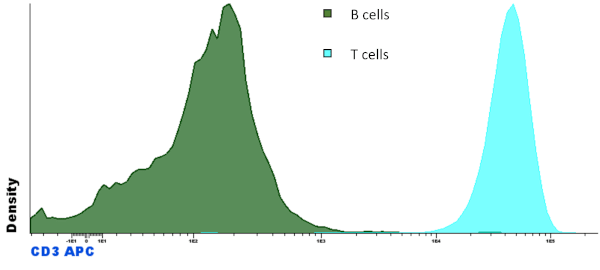
- Basic Histogram showing two populations in the same file: “B cells” and “T cells” with different colors.
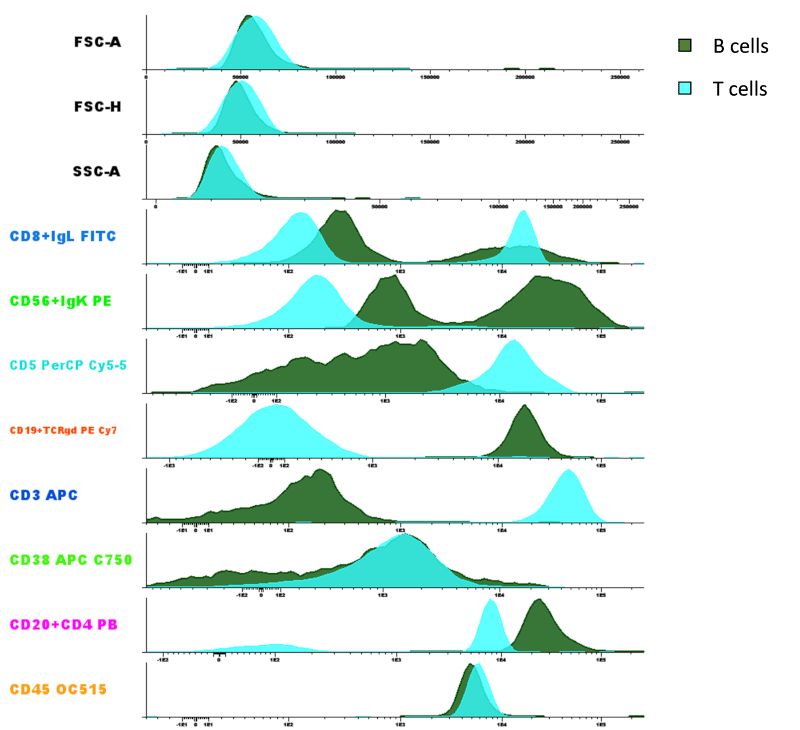
- Parameter Band Histogram showing two populations in the same file: “B cells” and “T cells”.
This type of multiparametric diagram allows us to see the expression of each marker contained in the file for the visible populations. The sample file used in this case is an LST tube containing 11 parameters (8 fluorescent/antibody channels + 3 FSC/SSC parameters).
How do I copy / save a diagram from Infinicyt™? Is it possible to save a diagram in publication / high quality?
To save a diagram in the computer, right click on the diagram and select Window > Export as Image and select the desired configuration (size, resolution, color mode) for the image.
IMPORTANT: Please take into account that the actual appearance of the diagram as you see it on the screen will be the final result saved (size of the diagram, labels, scale, resolution of the dots…), so you might need to resize the diagram in order to find the optimum size before continuing with the process.
See an example below of a diagram saved when having a small size on the screen (1) and the same diagram exported after increasing the size of the window (2) (both diagrams where exported using the same size and resolution).
(1) (2)
(2)
You can also copy and paste a diagram into a .ppt, doc file, etc, using the short-cuts Ctrl+C / Ctrl+V or right clicking on the diagram and selecting “Window” > “Copy Diagram”. Notice that these options will copy the diagram in less quality that when exporting as an image.
Additionally, you can copy and paste a diagram from the Manual Analysis to the Report. These diagrams are not final images and they keep their capacity to be updated or modified by the user as desired by right clicking on them when inside the Report.
How to create an analysis strategy? How to save gates?
When you analyze a file with one or more gates you can save these inside an Analysis Strategy in your Profile in order to apply the same gates later to other files (usually other files corresponding to the same antibody panel, so that it makes sense to apply the same gating strategy).
Once you have analyzed your file select “Profile” > “Save Analysis Strategy” and save with the desired name.
Save Analysis Strategy as Analysis Strategy
Usually we will draw gates and assign the events to a population of interest. In that case the Strategy Type will be “Analysis Strategy”; when we apply it to other files, the populations will be analyzed exactly in the same manner and the events will be automatically assigned to the corresponding populations.
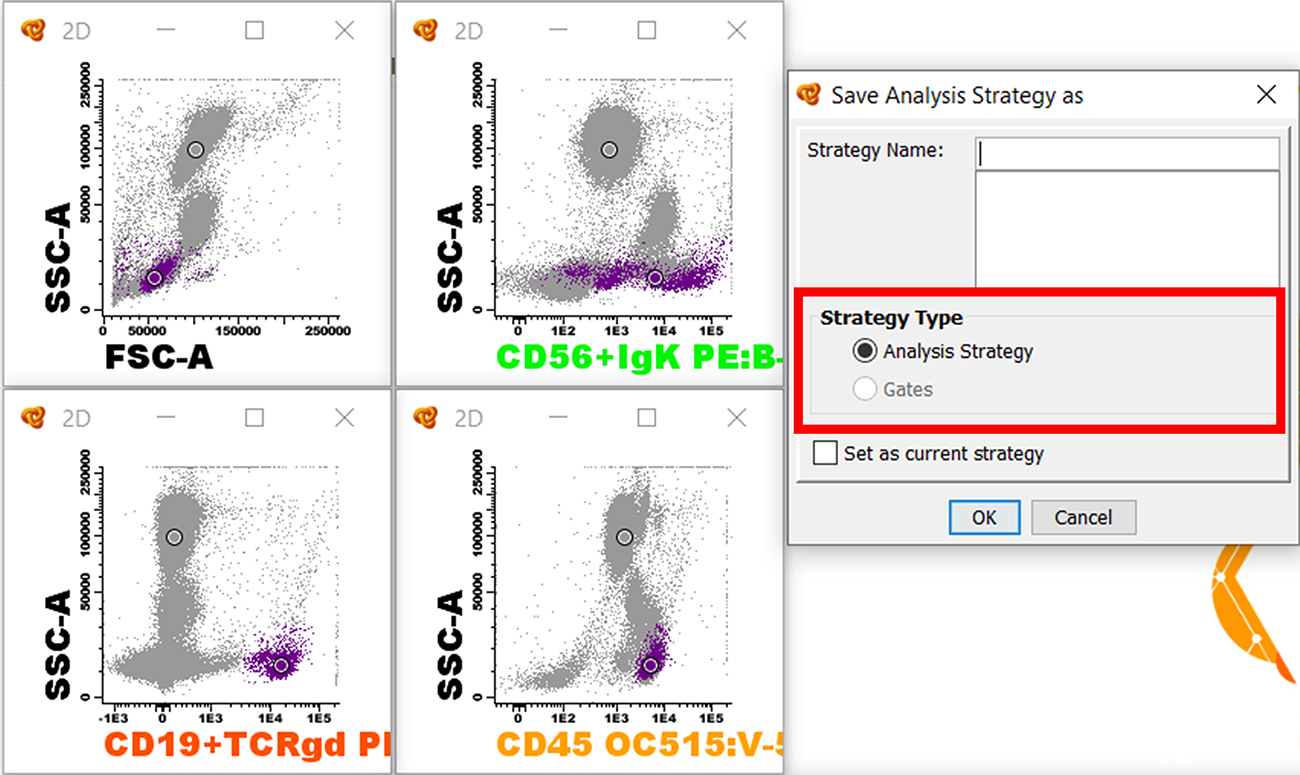
This method is usually used in order to create an analysis strategy to identify several populations at the same time that can be applied in several files that have the same parameters (antibody panel and parameters acquired). The populations of study will be identified equally on all samples (considering the events have a similar immunophenotype and the level of intensity of the different markers do not varies much). After applying the analysis strategy you can always review it or modify some of the gates slightly by clicking on the magnifying glass for the corresponding populations (Review column).
Save Analysis Strategy as Gates
If we draw some gates in one or more diagrams and save the analysis strategy without having assigned the events to a population the Strategy Type will be “Gates”. If we apply this analysis strategy to a new file Infinicyt™ will apply the same gates (without assigning them to a given population) and then we can readjust the gates if necessary and assign the events to a population.
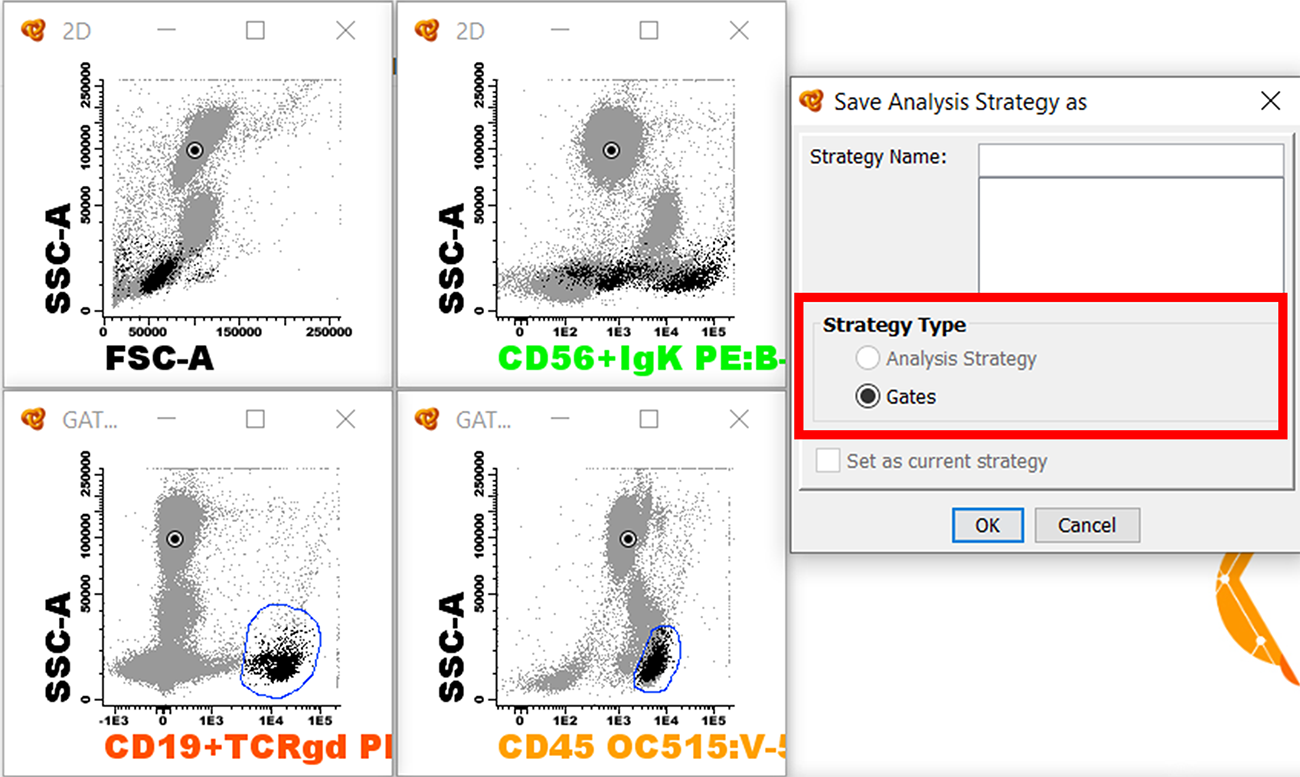
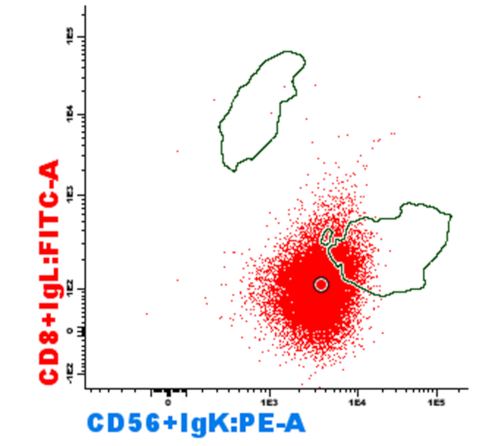
This method is especially useful in order to save several gates that are used for the identification of a single population as a template. In the example above the gates would be used for the identification of all B cells, so when applying the analysis strategy you would see those gates that you can still modify in case the marker expression of B cells differs slightly from the gates defined.
Try both procedures yourself in order to understand the utility of both approaches in order to rapidly analyze your files or to save complex gates as a template.
IMPORTANT: Remember that once the Analysis Strategy has been saved you always need to save your profile in your computer again by selecting “Profile” > “Save Profile in Folder …” (or “Save Profile in Manager”) in order to maintain these changes. Saving the profile is always the last step to be done when performing any change in the profile, modifying the diagrams, their order, size or labels, changing the report, changing the population tree…
Watch the “Analysis Strategy and Reference Image” videotutorial to see a demo about this topic.
What is a reference image?
Reference Image is a useful tool to compare events from a previously evaluated sample with the sample that is currently being analyzed. Groups of events are saved as a visual reference for future comparisons and can be displayed on the background of diagrams in the form of dots or density lines, together with its corresponding statistical data. The reference image is saved like a picture or photograph of all the events that are visible when it is saved (one or more files, several populations…).
The main applications of reference images are comparing normal or abnormal marker expression, comparing maturation patterns, evaluating minimal residual disease (MRD) and comparing control samples with test samples in research laboratories.
IMPORTANT: Reference images are saved within the Profile and thus it is very important that every time that you save the reference image (“Profile” > “Save Reference Image”) you save the profile again (“Profile” > “Save Profile …”).
You can save as many reference images as you like inside the same profile, but you can only visualize one at a time.
As you can only visualize one reference image at a time, you can save various populations in the same reference image. In order to do this, you should make visible all the populations that you would like to include on the image by using the visibility column, and then save the reference image. It is recommended, though, not to save populations as debris, those that are not of interest, or events which have not been analyzed because this will make the reference image heavier (it might take longer to load in the future).
On the same line as explained above, you can save a reference image obtained from several merged files.
Watch the “Analysis Strategy and Reference Image” videotutorial to see a demo about this topic.
What are the files generated by Infinicyt™? What is a CYT file? What is a Profile?
Infinicyt™ analyzed files are saved as CYT files, that can be stored wherever the user decides on the computer. These files contain a copy of the FCS file(s) used during the analysis, so once that is saved the FCS is not necessary anymore. Please keep in mind that even with the CYT file you can always come back to the original FCS by selecting “Edit” > “Reset Analysis” (Ctrl + R) and even exporting an FCS file from the CYT (“File” > “File Export” (Ctrl + E)).
Infinicyt™ Profiles (INP files) are files containing the analysis templates used for analysis of different antibody panels or samples (for example), which include the following elements:
- Diagrams and their specific configuration (size, order, label configuration, data visualization, etc.)
- Population tree
- Report
- Reference Images
- Analysis Strategies
- Export Statistics configuration
- Stored Compensations
IMPORTANT: Saving the profile is always the last step to be done when performing any change in the profile, modifying the diagrams, their order, size or labels, changing the report, changing the population tree… You can save the profile in your computer by selecting “Profile” > “Save Profile in Folder …”
Once a profile is saved in the computer you can save it in the Profile Manager (“Profile” > “Save Profile in Manager”) which will serve as a shortcut to access and manage profiles.
Infinicyt™ can also create other file formats such as:
- CSV, XLS, XLSX, HTML. File formats used to export statistics related to the analysis (% of different populations or information related to MFIs). Export through “Statistics” > “Export Statistics”.
- PNG, JPEG, BMP, GIF. File formats used to export diagrams as images. Export through right click on a diagram > “Window” > “Export as Image”.
- PDF, JPEG, PNG, GIF. File formats used to export the Report and save in the computer or printing. In order to create these open the report > “File” > “Save as …”
- XML. File format used to export the Report and integrate the information with the Laboratory Information System (LIS) or Laboratory Information Management System (LIMS). Infinicyt™ allows to modify the ID of the elements included in the XML report in order to identify them easily and improve extraction of information. To learn more about Infinicyt™ integration with LIS/LIMS please consult the FAQ Is it possible to connect Infinicyt™ to a Laboratory Information System (LIS)?.
Statistics
How can you create functions in Infinicyt™? For example, ratio between two populations. Can you make calculations in Infinicyt™?
Functions in Infinicyt™ are elements where you can perform calculations using your own numbers and/or information from the file analysis, percentage of events, fluorescence intensities…
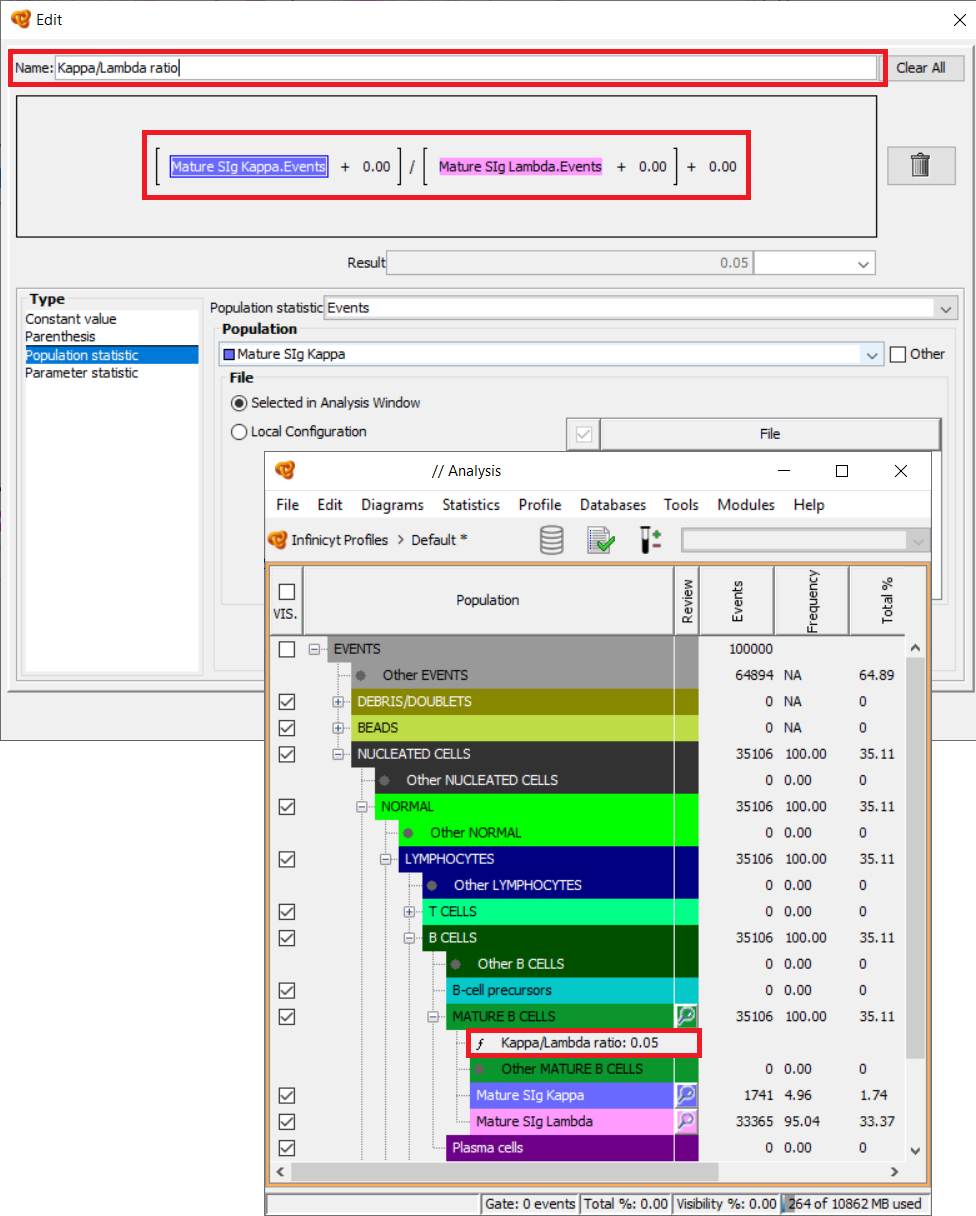
For example, you can create a function in order to calculate the Kappa/Lambda ratio of B-cells. In order to do so:
- Right click on any population in the Population Tree (for example B-cells). This will be the population under which the function will be located in the tree, but it does not have an impact on the results, values that can be used, etc.
- Add Function.
- Select a name for the function (for example “Kappa/Lambda ratio”).
- Define the function by using the various elements available:
- Mathematic symbols. Click on the mathematic symbol (“+” by default) in order to change it and select among those available: “+” (plus), “-“ (minus), “*” (multiplication) and “/” (division).
- Constant value. Any number selected by the user.
- Special element that allows to include more elements inside in order to separate calculations and make them in the desired order.
- Population statistics. Statistics such as total number of events, or % of events that are derived from the analysis of the tube.
- Parameter statistics. Statistics related to specific parameters inside the file such as MFI, CV, maximum value, among others.
Both Population statistics and Parameter statistics can be referred to specific populations in the analysis, and to all or only to some of the files included, so the configuration possibilities here are unlimited and very flexible.
- Once the function is finished select OK and the function will be created. The result of the function is shown on the right of its name. The result will be updated whenever there are changes on the values used for the calculation. A function can be moved around the Population Tree without changing its result.
Functions can later be used when exporting statistics or included in the Infinicyt™ report as any other element in the population tree.
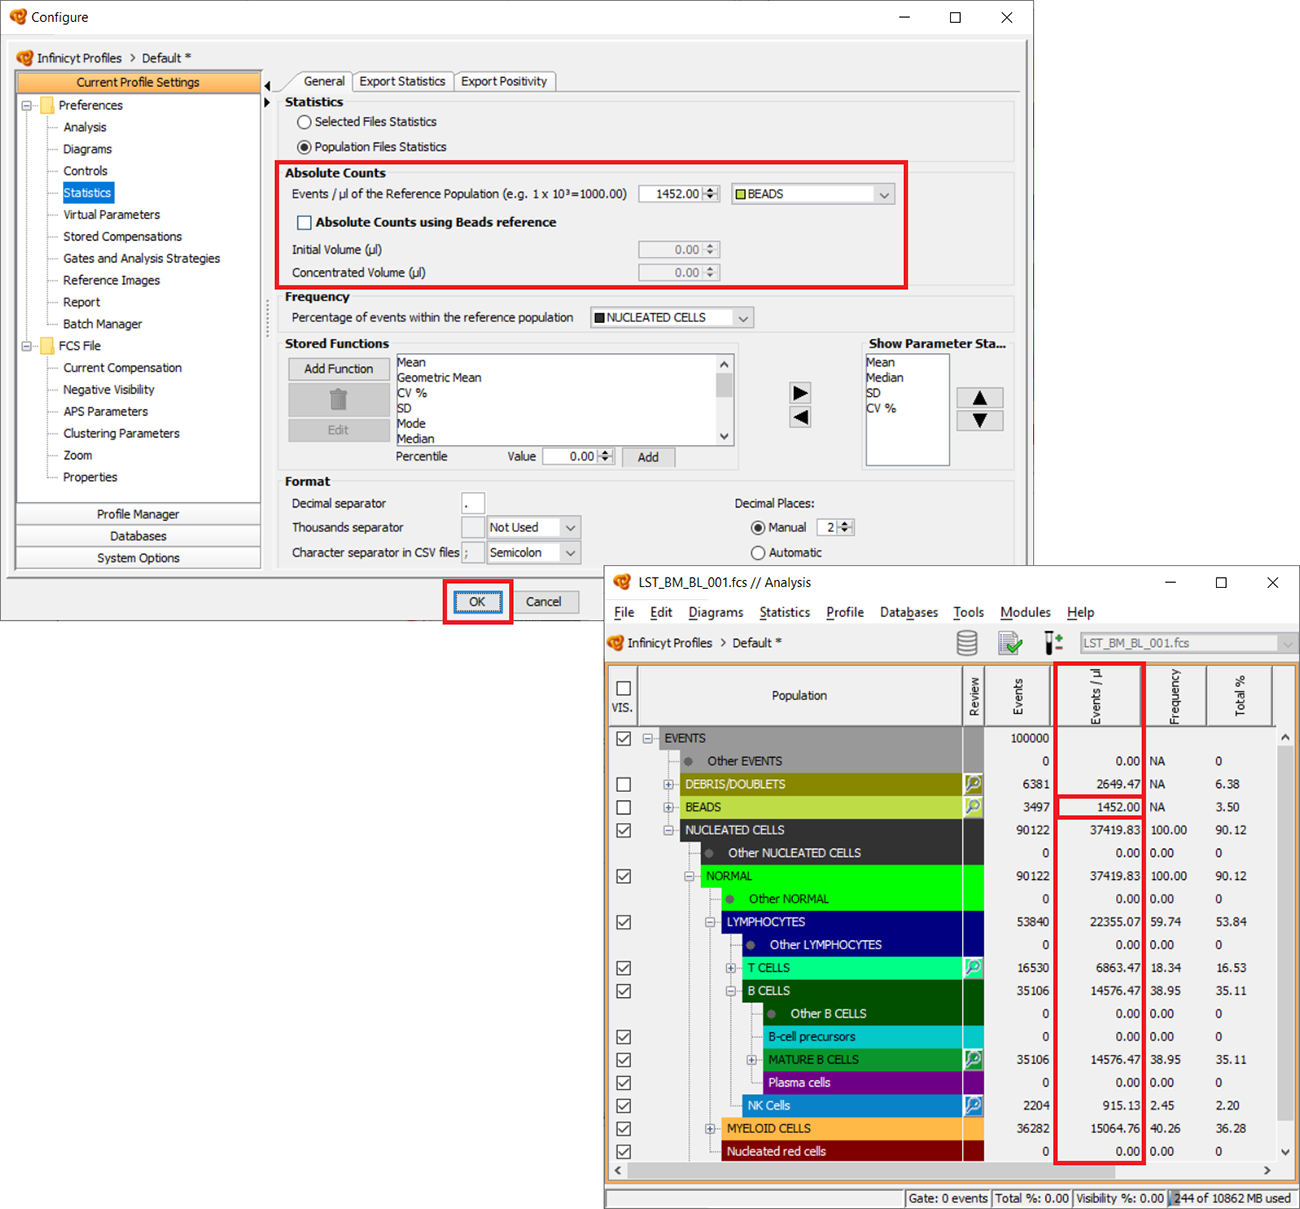
How to calculate Absolute Counts? How to calculate events/microliter?
Absolute Counts and Events/µl are displayed in the “Events/µl” column. In order to configure this column, go to “Statistics” > “Configure”. Under the “General” tab, you will see an “Absolute Counts” section.
There, you should select the reference population that will be used to make the calculations and type the value of Events/µl of that population in the acquired sample. Please realize that the value is multiplied by 1.000, so when introducing 50 it will mean 50.000 Events/µl.
If you are using beads you can check the option “Absolute Counts using Beads reference” in order to calculate the final concentration of beads in the sample by introducing the initial concentration of the beads (Events/µl), and initial and final volume (µl).
Click OK when the process is finished and the new values will be included in the “Events/µl” column for all populations in the analysis.
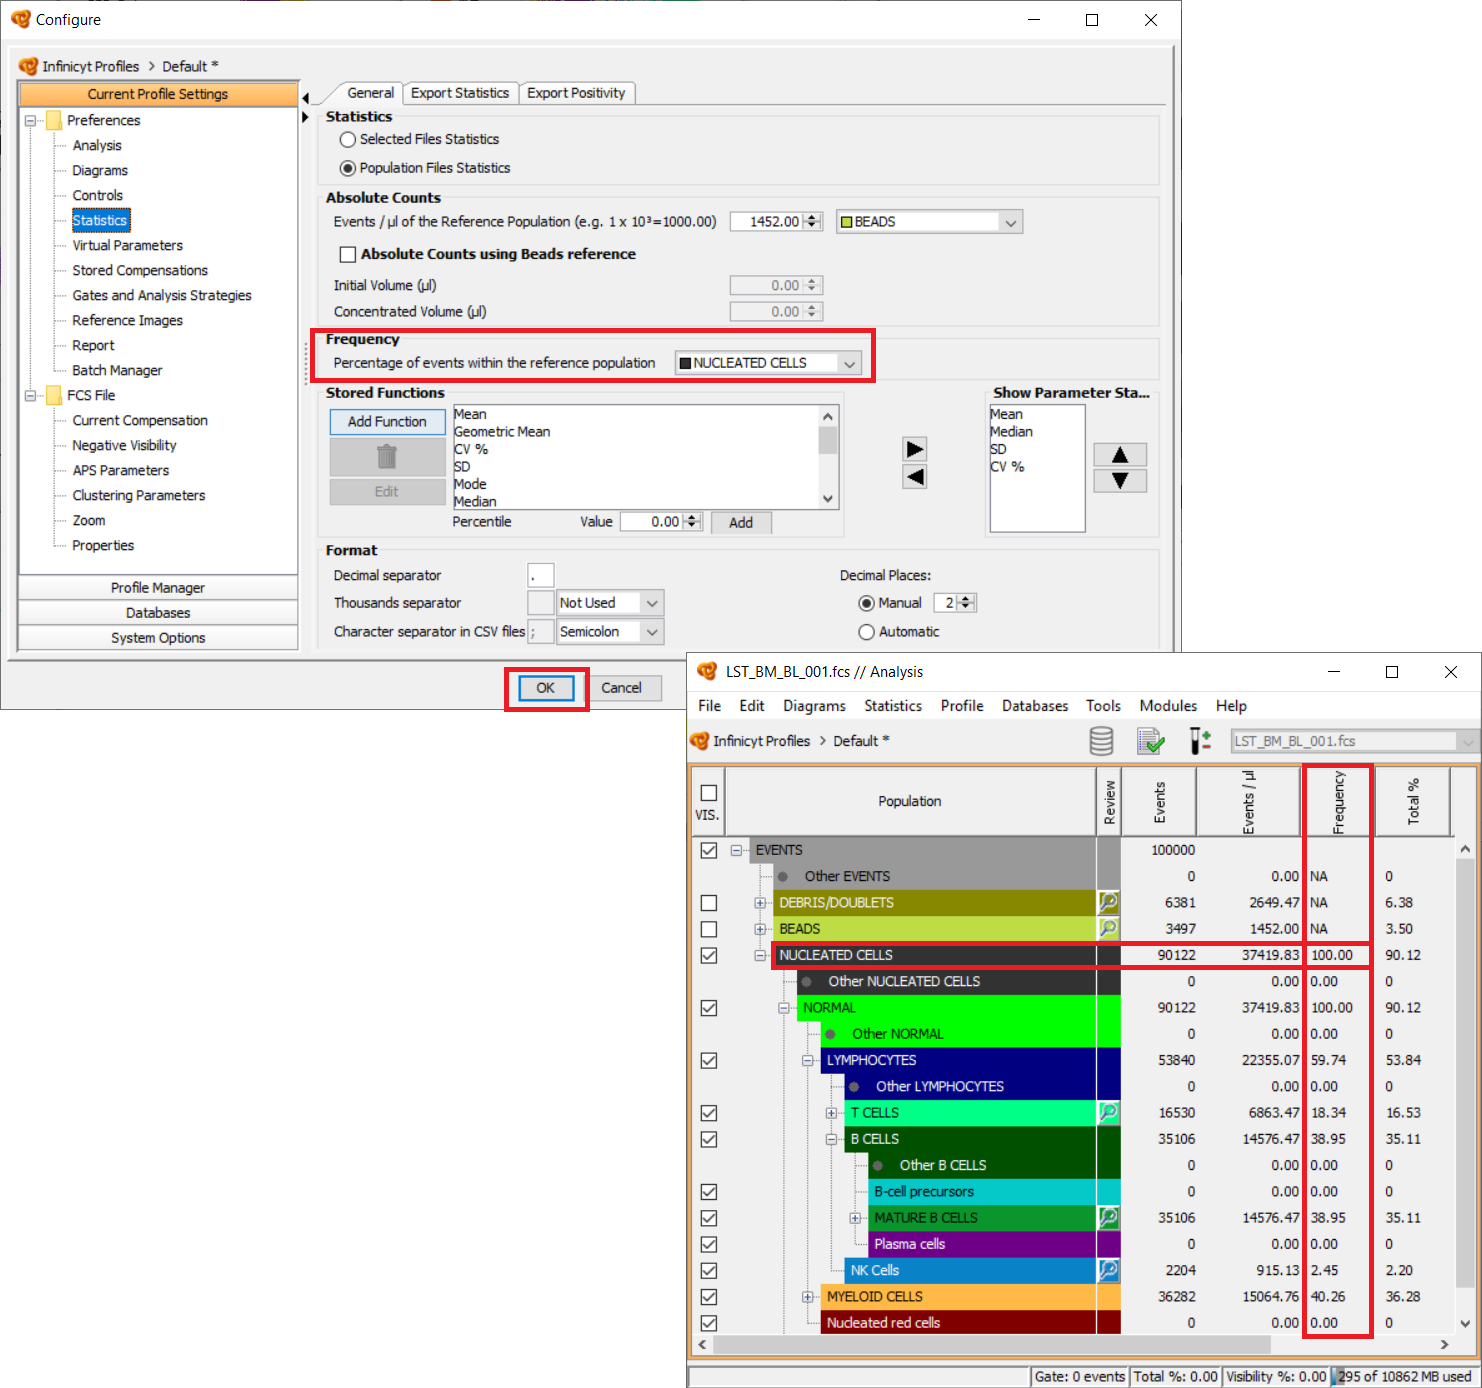
What is the Frequency? How is Frequency calculated?
Frequency is a statistic used to calculate the percentage that each population represents out of the total parental population selected as reference. An example of use of this feature is that we select “Nucleated cells” as reference. All populations located under “Nucleated cells” in the Population Tree will be calculated accordingly. This feature allows us to calculate the % of all these cell populations out of nucleated cells without considering Debris & Doublets, which are not to be included in the calculation of the frequency.
In order to configure this column, go to “Statistics” > “Configure”. Under the “General” tab, under “Frecuency”, you can select the population to be used as reference, usually “Nucleated cells” or “Lymphocytes”.
File Merge
Is it possible to work with several files simultaneously on Infinicyt™?
Yes, you can do this by using the File Merge module. When you merge several files with Infinicyt™, you will be able to perform a global analysis of all your files if you use common parameters to gate your study population.
Watch the “File Merge” videotutorial to see a demo about this topic.
How many files and events can be merged? How to optimize the performance of the software with large files?
There is no limit on the number of files or events that can be merged or open with Infinicyt™. This depends more on the characteristics of the computer that you are using.
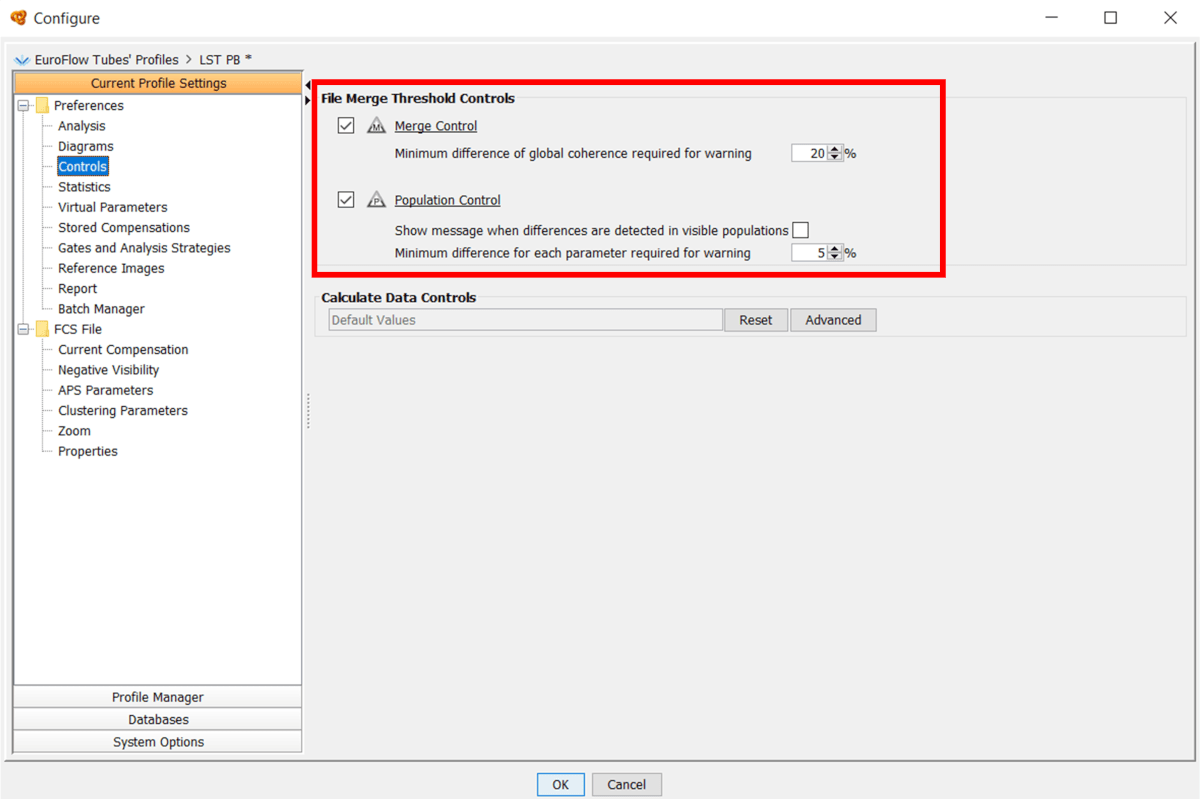
To speed up the process when the files are large in size or number, you can deactivate the fusion controls (“Profile” > “Configure” > “Current Profile Settings” > “Controls”).
Another recommendation is to always work with files on the current computer and not opening files from networks or shared folders. In case this is required we suggest comparing the analysis speed on the network and after copying the files to the current computer.
How many common markers are necessary to merge files?
Infinicyt™ does not need a minimum number of common markers to be able to merge files. Common markers are used to identify the same population in different files at the same time.
An example of this is the case of the BCLP-D panel of EuroFlow™, where CD45, CD20 and CD19 are used to identify B-cells in all the tubes of the panel.
Watch the “File Merge” videotutorial to see a demo about this topic.
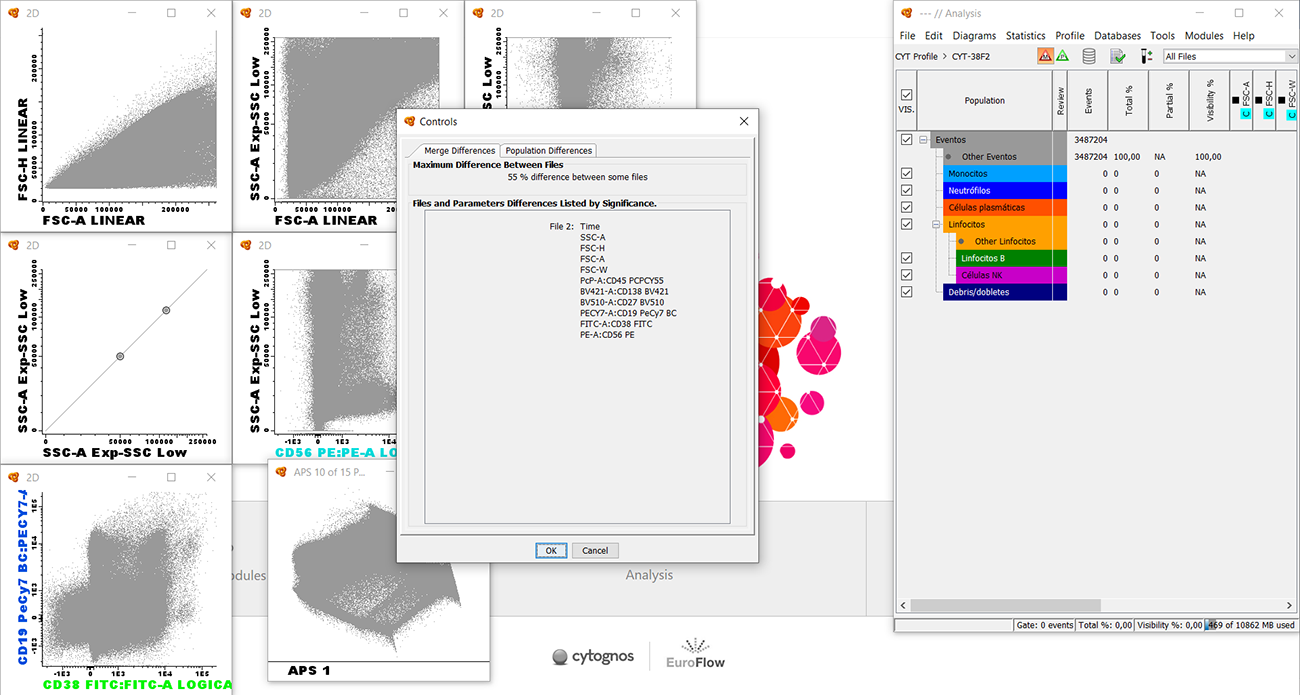
One of the merge controls is red, can I still perform the analysis?
Infinicyt™ merge controls are a feature to perform a quick control of the similarity of different tubes includes in the analysis. Its results allow you to analyze differences between files but it is you who must decide to continue or repeat the acquisition.
Click on the “Merge Control” button to open the “Controls” window listing the “Merge Differences”. The “Merge Differences” tab displays the percentage of difference between files (considering all events) and the most different parameters in each file listed by significance if they surpass the threshold control.
The “Population Differences” tab displays differences between each of the populations identified in several files, instead of all events together.
Compass tool
How do I create a Compass Database?
Our automatic update system will carry out the process in a simple way.
- You must perform these actions on a computer where you have installed Infinicyt™ software or Infinicyt™ driver and you have internet connection.
- Ensure that you have plugged in your computer the Infinicyt™ USB dongle that you want to update. If possible, please take out any other USB dongle connected.
- Go to https://go.cytognos.com/licenseupdate.
- Click on “License Update” tab.
- Click on the “Update Licenses” button.
- The Infinicyt™ license will be updated and the web will display a success message “Licenses updated successfully”.
Error messages and troubleshooting – EMS
Message: “To check for updates, the latest Sentinel LDK Runtime Environment must be installed. For assistance, contact Customer Support.”
Please follow the instructions below:
- Go to Admin Control Center > Configuration > Network (http://localhost:1947/_int_/config_network.html).
- At the bottom of the page, in the “EMS URL” section, add the following entries:
http://www.infinicyt.com:9080
https://ems.cytognos.com:8443
https://ems.cytognos.com:443
https://ems.cytognos.com
Do not edit or delete any of the existing information.
Then click on the “Submit” button. - Now you should be able to perform the update process successfully.
Additionally, this error will be fixed automatically when you install the latest version of Infinicyt™ 2.0 available at your Infinicyt™ Users Area.
If due to security restrictions, you cannot access the local tool Admin Control Center > Configuration > Network (http://localhost:1947/_int_/config_network.html).
Please follow these steps to perform the configuration using the configuration file.
- Locate and open the configuration file hasplm.ini, located in the following paths according to your system
- For Windows x64: %CommonProgramFiles(x86)%Aladdin SharedHASPhasplm.ini
- For Windows x86: %CommonProgramFiles%Aladdin SharedHASPhasplm.ini
- Locate the [EMS] section or create it at the end of the file if it does not exist
- Make a backup copy of the file, for example, by copying it to another location or by duplicating the file and renaming it.
- Add the following entries inside the [EMS] section:
http://www.infinicyt.com:9080
https://ems.cytognos.com:8443
https://ems.cytognos.com:443
https://ems.cytognos.com
Do not edit or delete any of the existing information in the hasplm.ini configuration file - Finally, save the file with the same name and in the same location, replace the file if necessary and restart the "Sentinel LDK License Manager" service to get the configuration working.
Additionally, this error will be fixed automatically when you install the latest version of Infinicyt™ 2.0 available at your Infinicyt™ Users Area.
Message: “The most up-to-date licenses are already installed.”
The Infinicyt™ license has already installed the latest update available. The Database Accesses have been already stored within your Infinicyt™ license, so there is nothing more that you must do. You can review the number of Database Accesses available in your Infinicyt™ license by opening Infinicyt™ > Databases.
If you have several Infinicyt™ licenses, please confirm that you are updating the correct one by checking the Infinicyt™ Serial Number (How can I find the Serial Number of my Infinicyt™ license?).
Please contact us if you think there is a problem related to your license or update.
Message: “Connect at least one key.”
An Infinicyt™ license is not connected to this computer or it cannot be detected.
I cannot update my Infinicyt™ License in a computer where Infinicyt™ is installed and there is internet connection.
If you do not have access to a computer where Infinicyt™ is installed and you have internet connection, we recommend you install Infinicyt™ in any other computer. You do not need to install the Database Connector there and you will not need to open Infinicyt™ there. If this is not possible either, please contact us and we will provide another installation protocol.
How many reference cases per group are necessary to create your own Compass Database? Is there a minimum number of cases to create a Compass Database?
There is not a minimum number of cases required to create a database. This requirement depends on the level of homogeneity of the cases included within the same group and standardization of future results. The more cases the database has, the more representative and consistent it will be.
Can I share the databases I have created with other Infinicyt™ users? Can I transfer my databases from one computer to others?
Yes, you can export databases and share them with other users or computers. In order to do so, go to “Profile” > “Configure” > “Databases” > “My Databases” > Right click on the database > “Export Database”. The database will be exported as a *.dbf file.
Transfer the file to other computer using any suitable means (USB drive, shared folder, cloud transfer…).
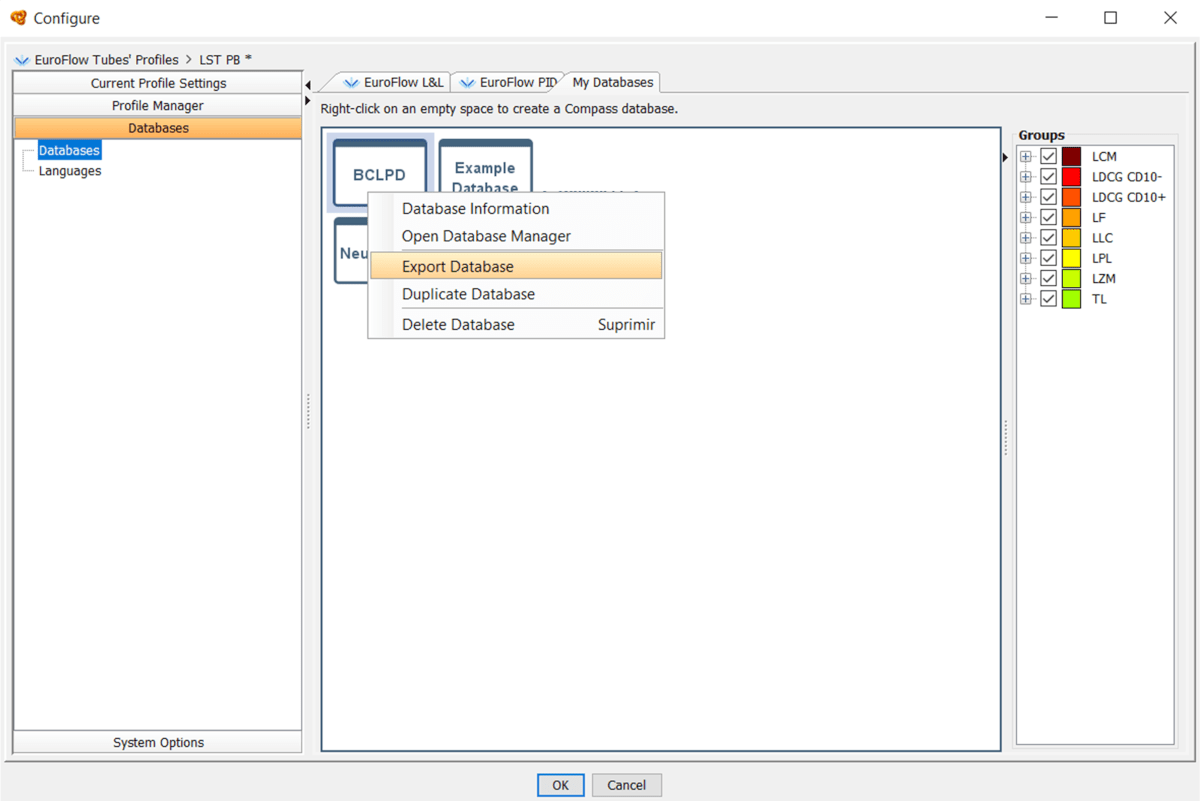
In order to import the database copy or download the *.dbf file in your computer, then open Infinicyt™ > “Profile” > “Configure” > “Databases” > “My Databases” > Right click on the white space in the Databases area > “Import Database” > Select the database file (*.dbf).
Maturation tool
What can I do with the Maturation tool? How can I use the Maturation tool?
The Maturation tool is especially designed for the study of variations in expression of several markers within different cell stages and their comparison with established normal patterns.
The Maturation tool will automatically separate a single population into several maturation stages by considering the evolution of the markers used by the user to “Draw Maturation Pathway".
The Maturation tool also allows to create a database of “normal” cases that can be used as reference for comparison of other cases. The database cases will be used to create a “normal” range for each parameter. Then each case will be compared to the “normal” range and the software will tell what the expression of the case for each stage is and whether it differs from the “normal”.
The Maturation tool produces a Maturation Diagram with several visualization options available, representing all the events (cells) analyzed, the median of the file(s), 1SD and 2SD…
Watch the “Maturation” videotutorial to see a demo about this topic.
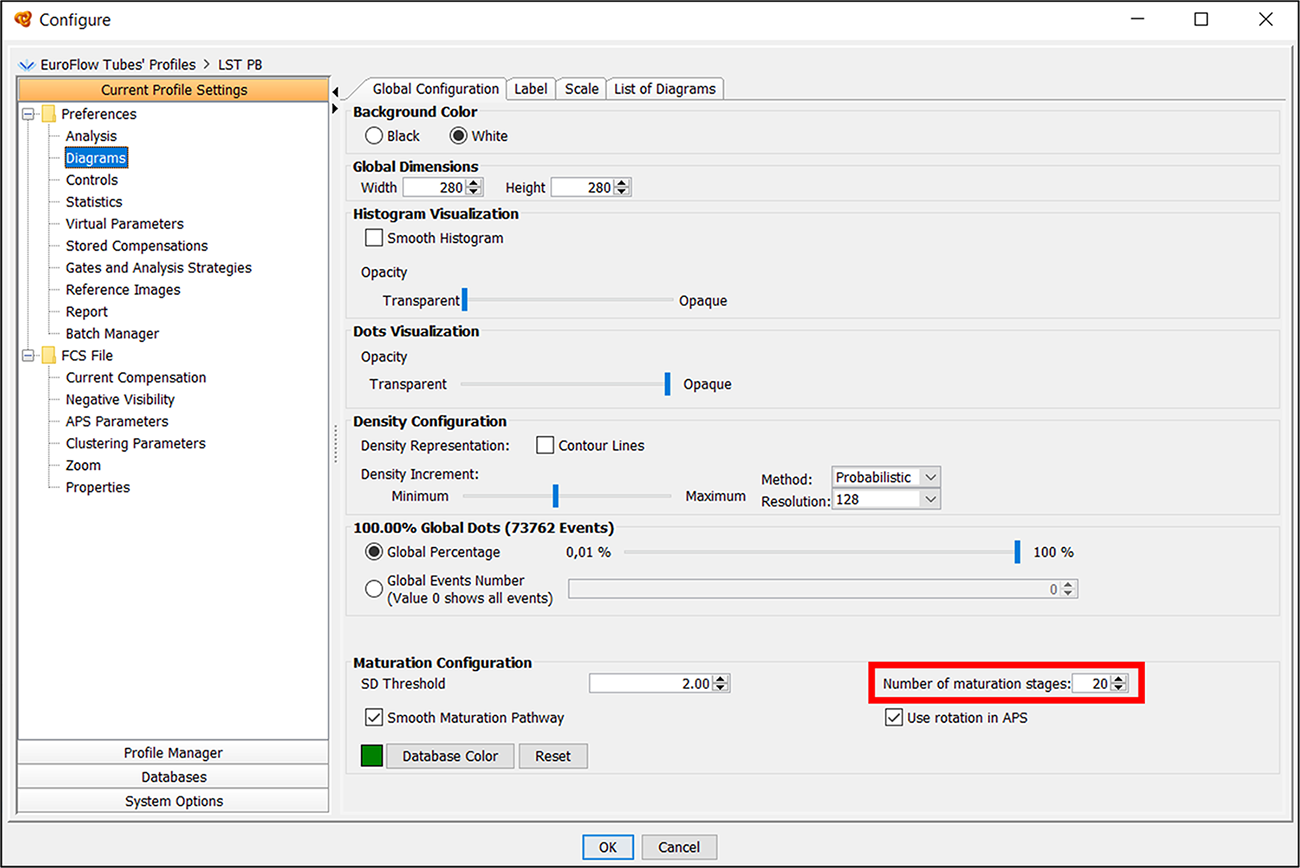
Can the number of stages be modified in maturation diagrams?
The number of stages displayed in maturation diagrams is 20 by default. You can configure this number by going to “Profile” > “Configure” > “Current Profile Settings” > “Diagrams” > “Number of maturation stages”.
Watch the “Maturation” videotutorial to see a demo about this topic.
Compensation
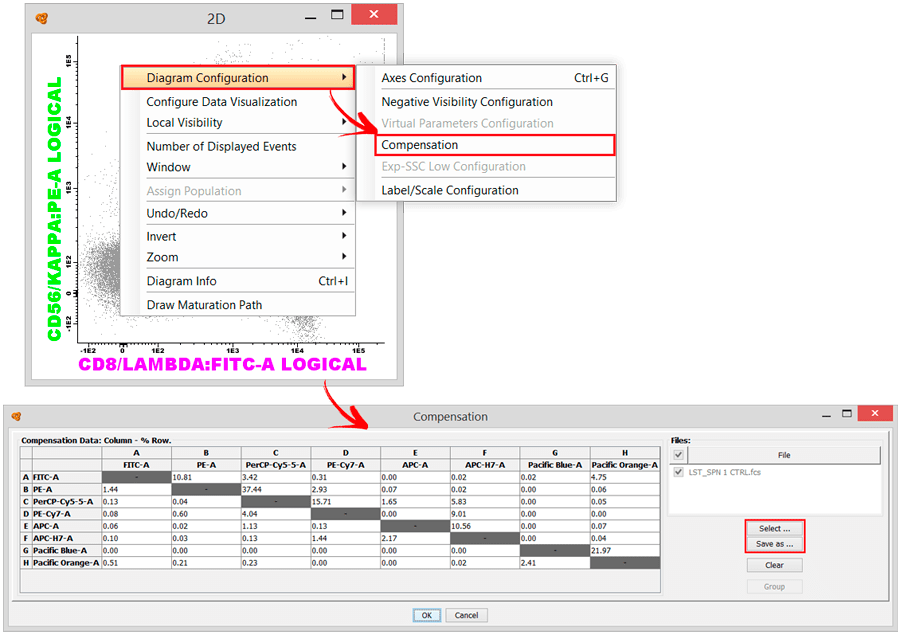
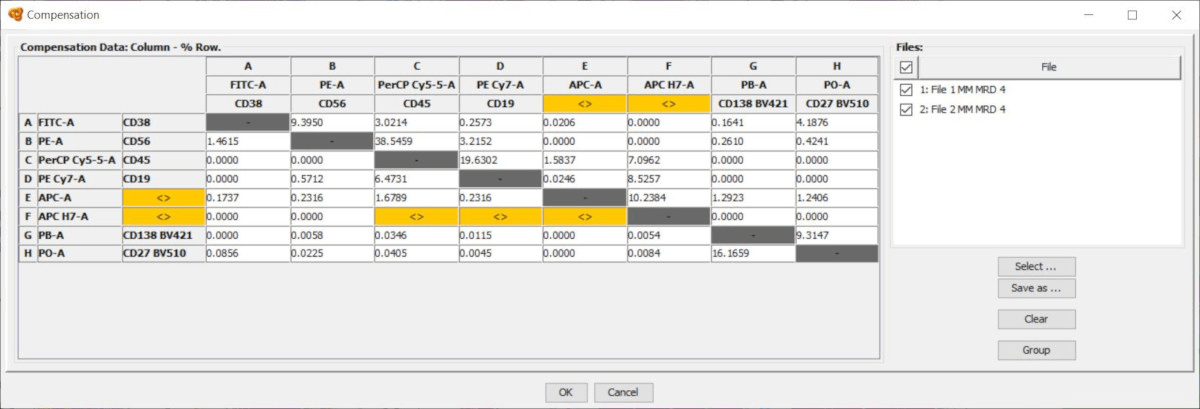
Is it possible to modify the compensation matrix?
Yes, open a file with Infinicyt™, and you can easily access the compensation matrix by right clicking on a diagram and selecting Diagram Configuration > Compensation. Here, it is possible to manually edit the compensation matrix, save a compensation matrix, or even apply a compatible compensation matrix that has previously been stored in the same profile or imported from a separate file (*.ipf) (“Profile” > “Configure” > “Stored Compensations” > “Export” and “Import”).
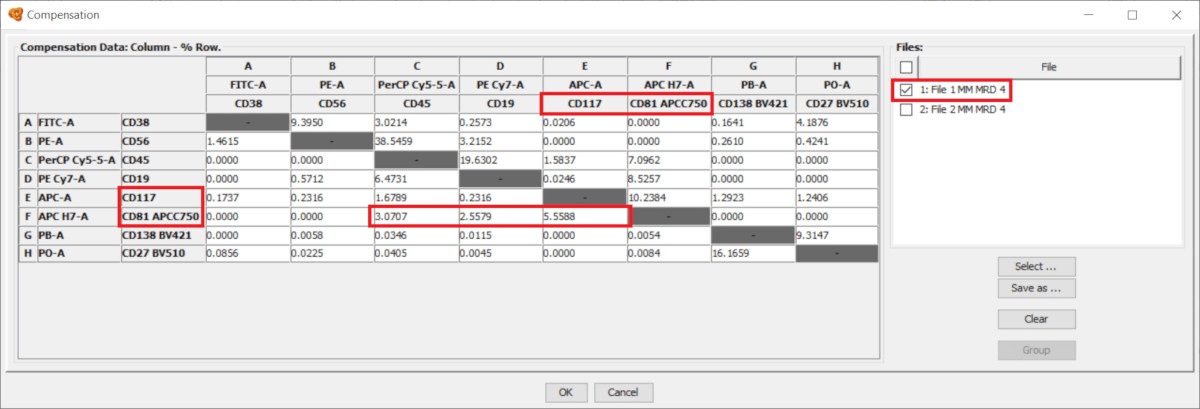
When several files/tubes are open (Merge) each tube can have a different compensation matrix, or they can have the same.
- All parameters that are common will be shown as usual (white or gray background) and the compensation value can be directly modified.
- Tube-specific parameters are highlighted with an orange background, which indicates that the parameter or value shown below is not the same for all tubes. You can hoover the mouse above these cells and the tooltip will indicate the content of the cell.
If you click on any of these cells you can modify the compensation value for all tubes at the same time, and they will be displayed with a white background. On the other hand, you can use the Visibility Column on the right side of the window to display only some of the tubes. The compensation matrix shown only applies to the visible tubes.
Notice that Infinicyt™ also includes an offline compensation tool, which allows the calculation of a compensation matrix based on compensation controls.
Watch the “Offline Compensation” videotutorial to see a demo about this topic.
Report
How do I save my report in my computer? Can I print the report directly from Infinicyt™?
Once you have configured report and analyzed the file, select “Export PDF” in order to save the report in your computer in this format.
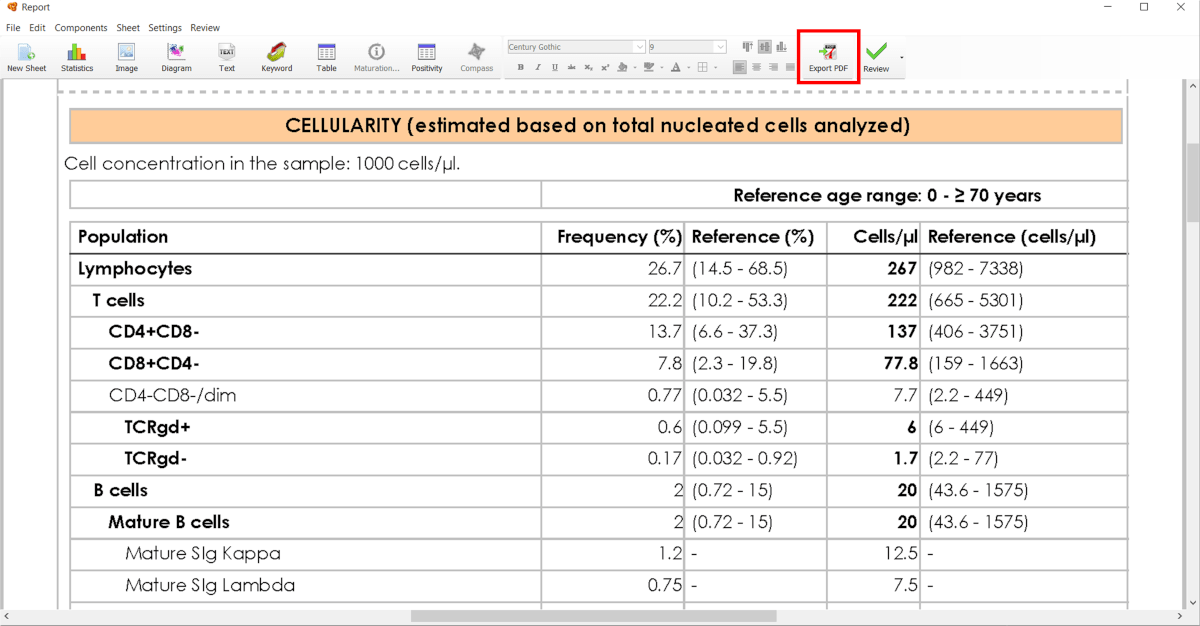
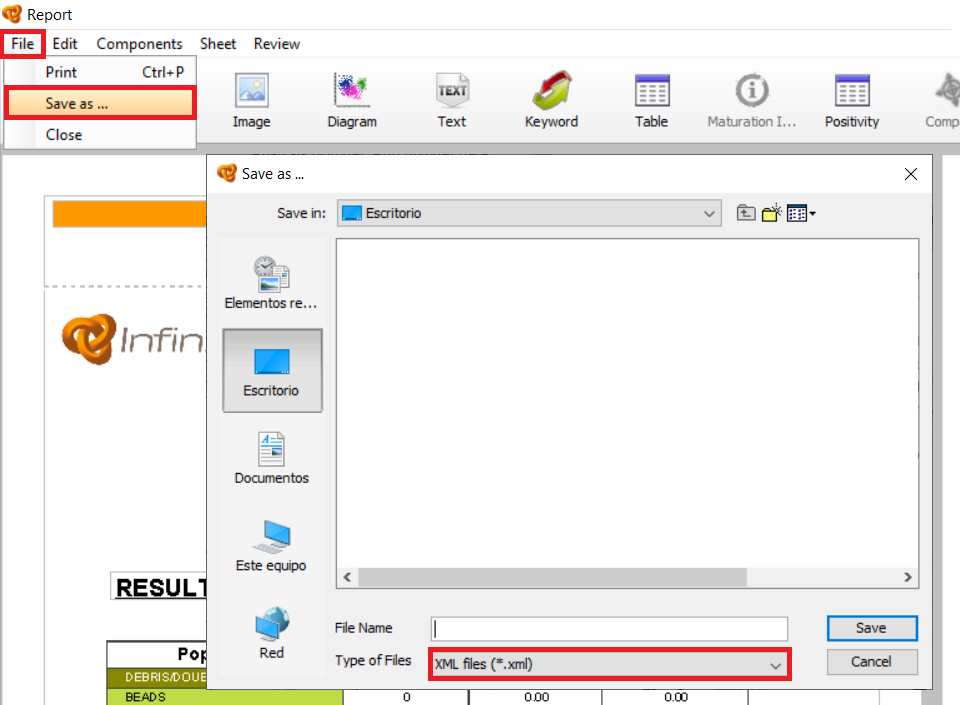
You can also save the report through “File” > “Save as …” and select one of the file formats available: PDF, image (bmp, gif, jpg, png) or XML.
Finally, you can print the report after saving as PDF or through “File” > “Print”, where you can select the printer, properties, pages to print and number of copies.
Is it possible to connect Infinicyt™ to a Laboratory Information System (LIS)?
Yes, this can be done using the XML report.
When the report is finished, users must configure the Advanced tab of each component to be included in the XML report as seen in the picture (Right click on each element > “Configure Component” > “Advanced” tab > Check “Export”). An ID should be given to each component to easily identify it in the XML file (e.g. “statistics_table”, “diagram_SSC_CD19”, etc.) (ID is not mandatory but highly recommended). Only the components with the “Export” box ticked will be exported in the XML report file.
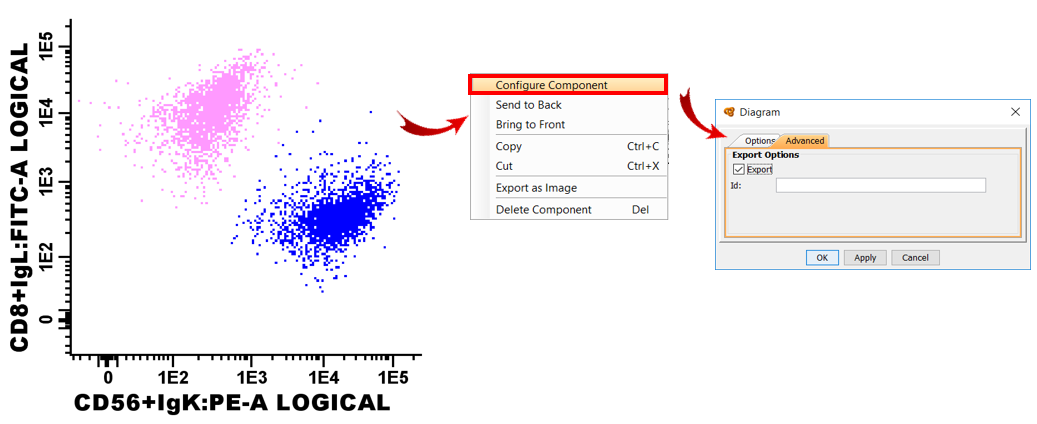
Once all components are configured, the report can be exported in XML by clicking on “File” > “Save as” > “XML” in the Report window.
Infinicyt™ generates a XML file that the LIS has to read. In order to do so the LIS must “know” what is the structure of the XML and how to read it.
- In the following link you can find a PDF manual to link the results with your LIS.
- You may also need to consult the scheme.xsd document to learn more about the internal format of XML files exported by Infinicyt™.
File scheme.xsd checksum (MD5): 7A73AE496BDBD59DB50F78C06D01BF23
How to cite Infinicyt™ in a scientific publication?
Infinicyt™ should be cited in the “Literature cited” or “References” section as “Infinicyt™ Software. Version 2.0. Cytognos, SL. Salamanca, Spain.”.
NOTE: The version number cited above may not be up to date. Please check your version when Infinicyt™ is running (“Help” > “About Infinicyt”).
Automated Gating & Identification
How does the Automated Gating and Identification work?
The Automated Gating and Identification uses different algorithms to cluster all events of the sample. Events that are phenotypically similar (in a multidimensional space, not by comparison of individual parameters) will be put together within the same cluster or group of events.
Then each cluster is compared to the normal reference database and will be identified according to its similarity to those references.
- Those clusters that are phenotypically similar to the normal references will be classified as “Normal Populations” with a given name (like B cells, T cells, Monocytes, etc.).
- Those clusters that are similar to the normal references but not exactly falling within the acceptance range (based on SD ranges) will be classified as “Check Populations”. They need to be reviewed by the user to confirm them as normal, abnormal or others (Debris, Doublets or Out of Scale) in order to finish the analysis.
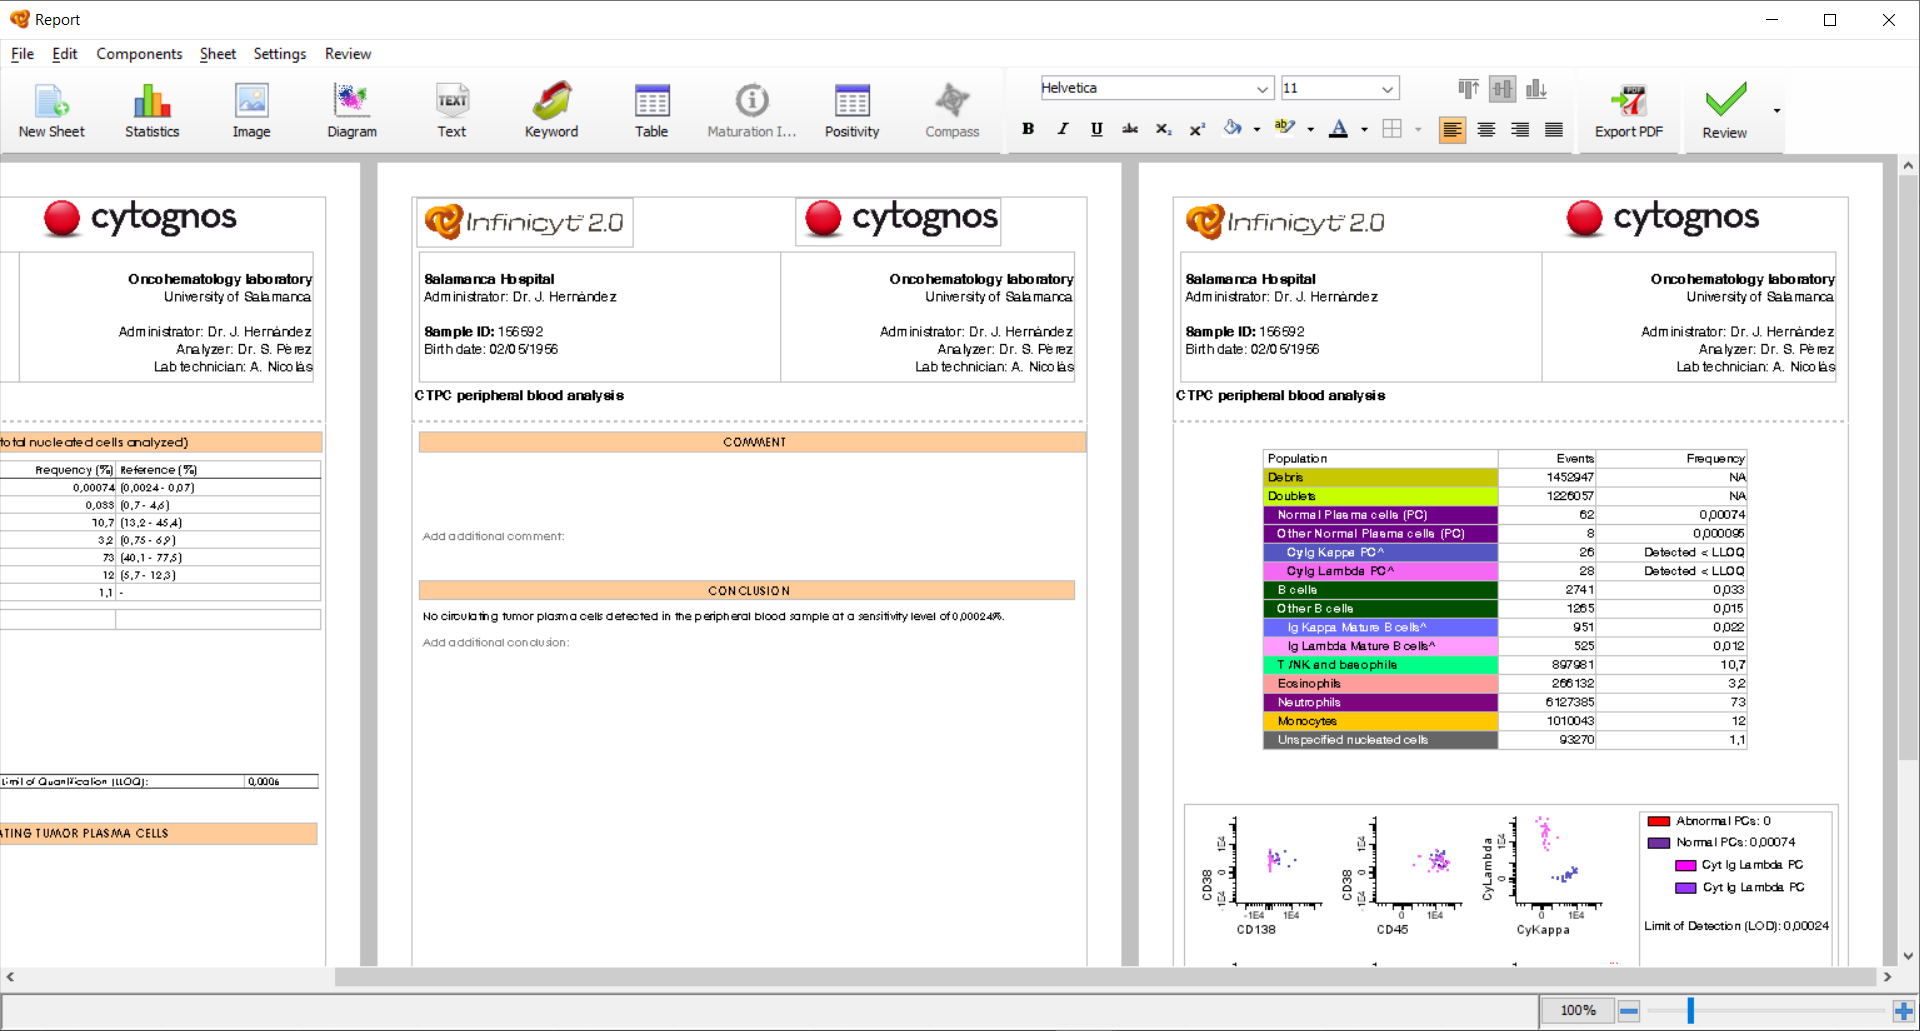
Once the sample has been completely analyzed you can open the Automatic Report (Report icon in the Manual Analysis window, or “File” > “Report”) that includes specific statistics, comments and conclusions established by EuroFlow™ for a consensus and convenient report of the analyzed data, taking into account the type of sample and cells of study. Additionally, it includes a comparison between the sample data and the normal reference ranges of the EuroFlow™ Database. The automatic report is available in 13 different languages (English, Spanish, Czech, German, French, Italian, Dutch, Polish, Portuguese, Romanian, Chinese, Japanese and Korean).
How to review the Check populations?
The software names as “Check Populations” the clusters that are similar to one of the populations of the database but do not fall within the established acceptance range to be identified as “identical” to these populations. The “Check Populations” are the populations to be reviewed by the user to confirm them as normal, abnormal or others (Debris, Doublets or Out of Scale).
To do so you must click on the question mark icon next to each population and a node named “Related Populations” is displayed. “Related Populations” are populations similar to the population being reviewed. The user must review the events by using the diagrams (compare the immunophenotype of the “Check Populations” with other populations) and assign them to the corresponding related population or to any other population of the population tree depending on their immunophenotype.

Watch the “Automated Gating and Identification” videotutorial to see a demo about this topic.
Which databases are available for the Automated Gating and Identification and for Compass Classification?
The Automated Gating and Identification is available for:
- LST
- ALOT
- MM-MRD
- CTPC
- PIDOT
Compass classification is available for:
- ALOT
Samples should be prepared using the EuroFlow™ SOPs for instrument set-up, sample preparation and antibody panels. They should be acquired in a cytometer compatible with the databases (e.g. Omnicyt™). Visit this website to learn more about Cytognos Next Generation Flow™ solutions.
What are the factors that most affect the Automated Gating and Identification? Why do I obtain a high % of Check Populations?
Anything that affects the image seen in diagrams which will make the populations different to the expected results (those in the database) might cause worse results (e.g. differences in FSC, SSC, negativity, marker intensity, compensation). It is paramount to strictly follow the EuroFlow™ SOPs to obtain a good result.
Some of these factors are:
- Reagents (Washing and acquisition buffers, lysis solutions, antibodies). All these reagents should be used according to the EuroFlow™ recommendations or those included in our lyophilized kits.
- Sample processing. Related to the reagents used, the samples must be processed according to the recommended guidelines (EuroFlow™ SOPs), including all washing and staining steps, volumes used in each of them, centrifuge time, speed and volume, BulkLysis procedure, how the mixing is done in each step, final acquisition volume/concentration…
- Cytometer configuration. This includes several elements: Voltage configuration for PMTs (which should be done using the EuroFlow™ Rainbow Beads and the specific target ranges for each lot and instrument used), FSC and SSC configuration, threshold for FSC and compensation configuration (which should be done using generic compensation for generic dyes and specific compensation for tandem dyes and specific fluorochromes that are used in each panel (provided in our lyophilized kits as compensation tubes)).
- Acquisition setup. Speed of acquisition must be strictly followed in order to ensure appropriate detection of all cells as singlets (no increase of doublets) and its fluorescent signals. Additionally, too high acquisition speed or highly concentrated samples might provoke clogging of the instrument, deletion of events due to limitations in the electronic system or remarkable variations in the number of cells acquired. The acquisition should be homogeneous along time in order to ensure homogeneous expression for all markers so that all populations are equally present during the whole acquisition.
If the software finds there is a higher % of “Check Populations” (those that are not identified as “Normal Populations” by the software) than expected it will display a warning about it. (Be aware this does not necessarily mean a problematic result from a quality point of view: for example an abnormal sample might include a significant “Check Population” including abnormal blasts above the expected range, not because of processing or analysis issues).
Does the Automated Gating & Identification use all parameters included in the file?
The first step of the AG&I is a clustering process where events that are phenotypically similar will be put together within the same cluster or group of events. The clustering phase uses all parameters of the file included in the Database with the exception of the parameter Time.
The parameters included in the Database are:
- 8 parameters corresponding to the 8 antibody markers used (Pacific Blue-A, OC515-A, FITC- A, PE-A, PerCP-Cyanine5.5-A, PE-Cyanine7-A, APC-A, APC-C750-A).
- 3 parameters corresponding to SSC-A, FSC-A and FSC-H.
All extra parameters that are not included in the Database will not be used in the next step of the process (Identification against the Database) and they should be removed from the file before running the tool. This will reduce the complexity and weight of the files when they are saved, increase speed of analysis and software performance, and reduce time of analysis.
In order to remove the extra-parameters from the file(s):
- Open the file(s) with Infinicyt™.
- Click on the Add/Remove File icon.

- In the “Add/Remove File” window you can deselect the parameters that are not of interest in the analysis and when you click OK they will be removed from the current analysis (they will be kept in the original FCS file, which is not modified during the analysis).
- Once the undesired parameters have been deselected you can run the Database through the “Databases” icon.

Which type of files (cytometer based) can be used for the Automatic Gating and Identification and for Compass Classification?
EuroFlow™ Databases have been validated with BD FACS Canto II. To obtain optimal results with other instruments like Omnicyt™, Thermo Fisher Attune NxT or BD FACS Lyric, a specific configuration and setup are required. For more information about these or other instruments please Contact Us.
Can I do changes to the default Automatic Report? Can I add additional comments to the Automatic Report?
The structure of the first two sheets of the default Automatic Report cannot be modified. All tables, comments and conclusions are updated automatically with your analysis. In some sections there is a “Comment” text box where you can write custom comments in addition to the default information.
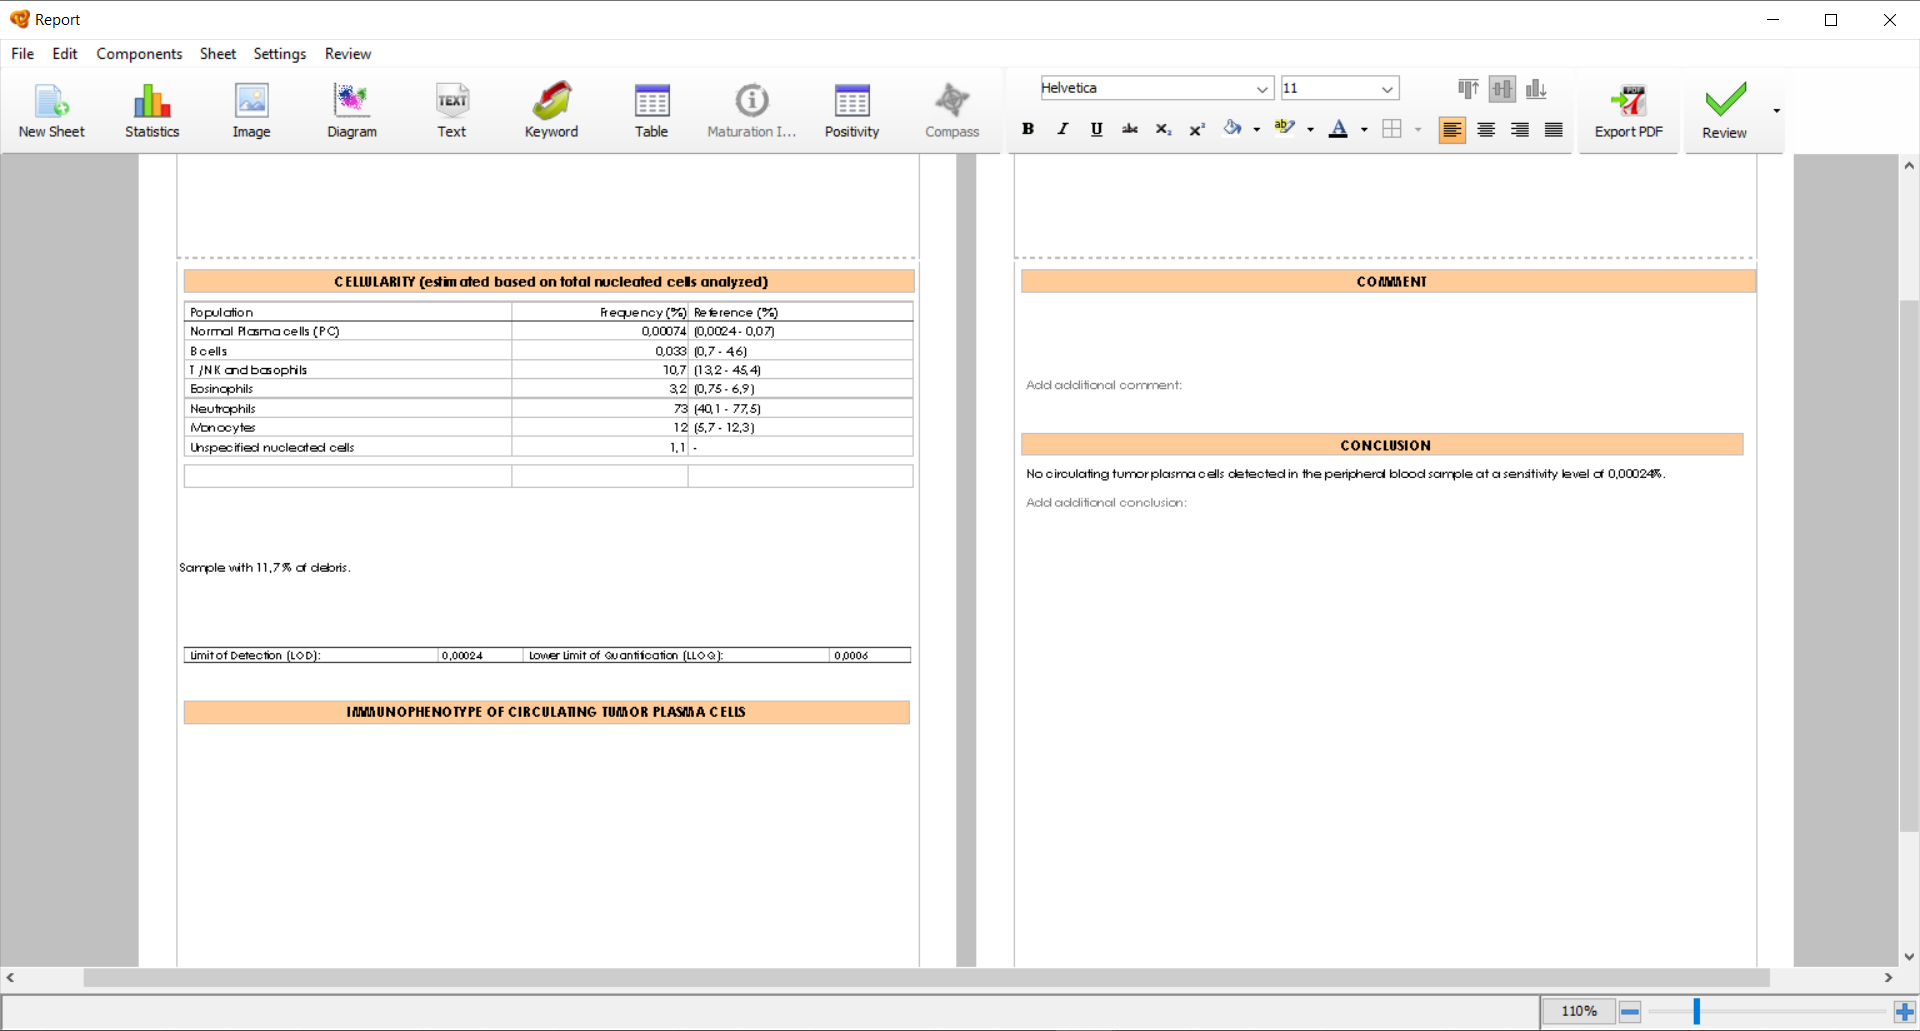
You can modify the Header and Footer of the Automatic Report by adding the desired elements to these sections, which will be included in all the sheets of the Report. Additionally, you can add new sheets that are customizable where you can add any element of interest (diagrams, statistic tables, population tree, comments, etc.). These sheets are highlighted with the message “This page is user-defined” at the bottom left margin.
After modifying the Header or Footer, or adding new sheets to the Automatic Report, you can save these changes and include them in the default Automatic Report by clicking on “Settings” > “Set as Default Report”. The same report (including your customized elements) will be used in future runs of the current EuroFlow™ Database.
How are the Frequency reference values calculated for the normal populations?
When using the EuroFlow™ Databases, Frequency is defined as the percentage of a given population compared to total “Nucleated cells” identified in the sample.
The reference values included in the Databases are calculated based on the normal reference samples included within the Database. Additionally, in the case of PIDOT Database, different age segments are considered, with different reference values for each age segment.
When the Frequency value of some population in the current case is out of the normal range, the row corresponding to this population is highlighted in bold.
Always refer to the manufacturer's instructions for use. These products are not available for purchase by the general public.